최초 작성일: 2022년 06월 07일
최근 수정일: 2022년 08월 13일
요약
2022년 5월 18일에 RHEL 9.0이 정식 출시 되었습니다. 단독 설치 및 듀얼 부팅 설치를 진행합니다.
설명
IBM의 정책 변경으로 RHEL의 무료 배포판인 CentOS 8이 2021년 말 지원종료(EOS) 됐습니다. 모두가 새로운 솔루션을 찾고 변화에 빠르게 적응할 수 있는 인프라를 가지고 있는 것은 아니기에, 이 소식은 많은 기업과 개발자들에게 갑작스러웠으며 타격이 컸을 것으로 예상합니다.
기존의 CentOS는 CentOS Stream으로 전환됐는데 이것은 RHEL 공식 배포판과 다른 RHEL 업스트림 브랜치 기반입니다. (업스트림 브랜치란 실시간으로 변화/업데이트가 적용됩니다. 안정성, 보안 등 장단점이 존재합니다) 레드햇은 기존 사용자들이 RHEL 호환 리눅스를 잃은 상황에서 대안으로 Red Hat Developer Program에 RHEL 무상 이용 조건을 확대했습니다. 다른 대안으로
Rocky Linux (로키 리눅스), AlmaLinux (알마리눅스) 등 CentOS 대체 리눅스도 등장했습니다.
‘Red Hat Developer Subscription for Individuals’에 등록하여 RHEL을 무상으로 사용할 수 있습니다. 프로그램 가입은 무료입니다.
본 게시글에서는 Red Hat Developer 프로그램 무료 구독부터 설치까지 다룹니다.
솔루션
윈도우와 리눅스의 듀얼 부팅 예정이라면, 윈도우를 먼저 설치해야 한다. 리눅스를 먼저 설치하고 그 위에 윈도우를 설치할 경우, 윈도우는 기존 리눅스의 부트로더를 덮어쓰기 때문에 리눅스는 부팅불가 상태가 된다.
지원되는 아키텍처:
0. GPT 형식으로 디스크 설정
1. 레드햇 가입, 로그인, ISO 다운
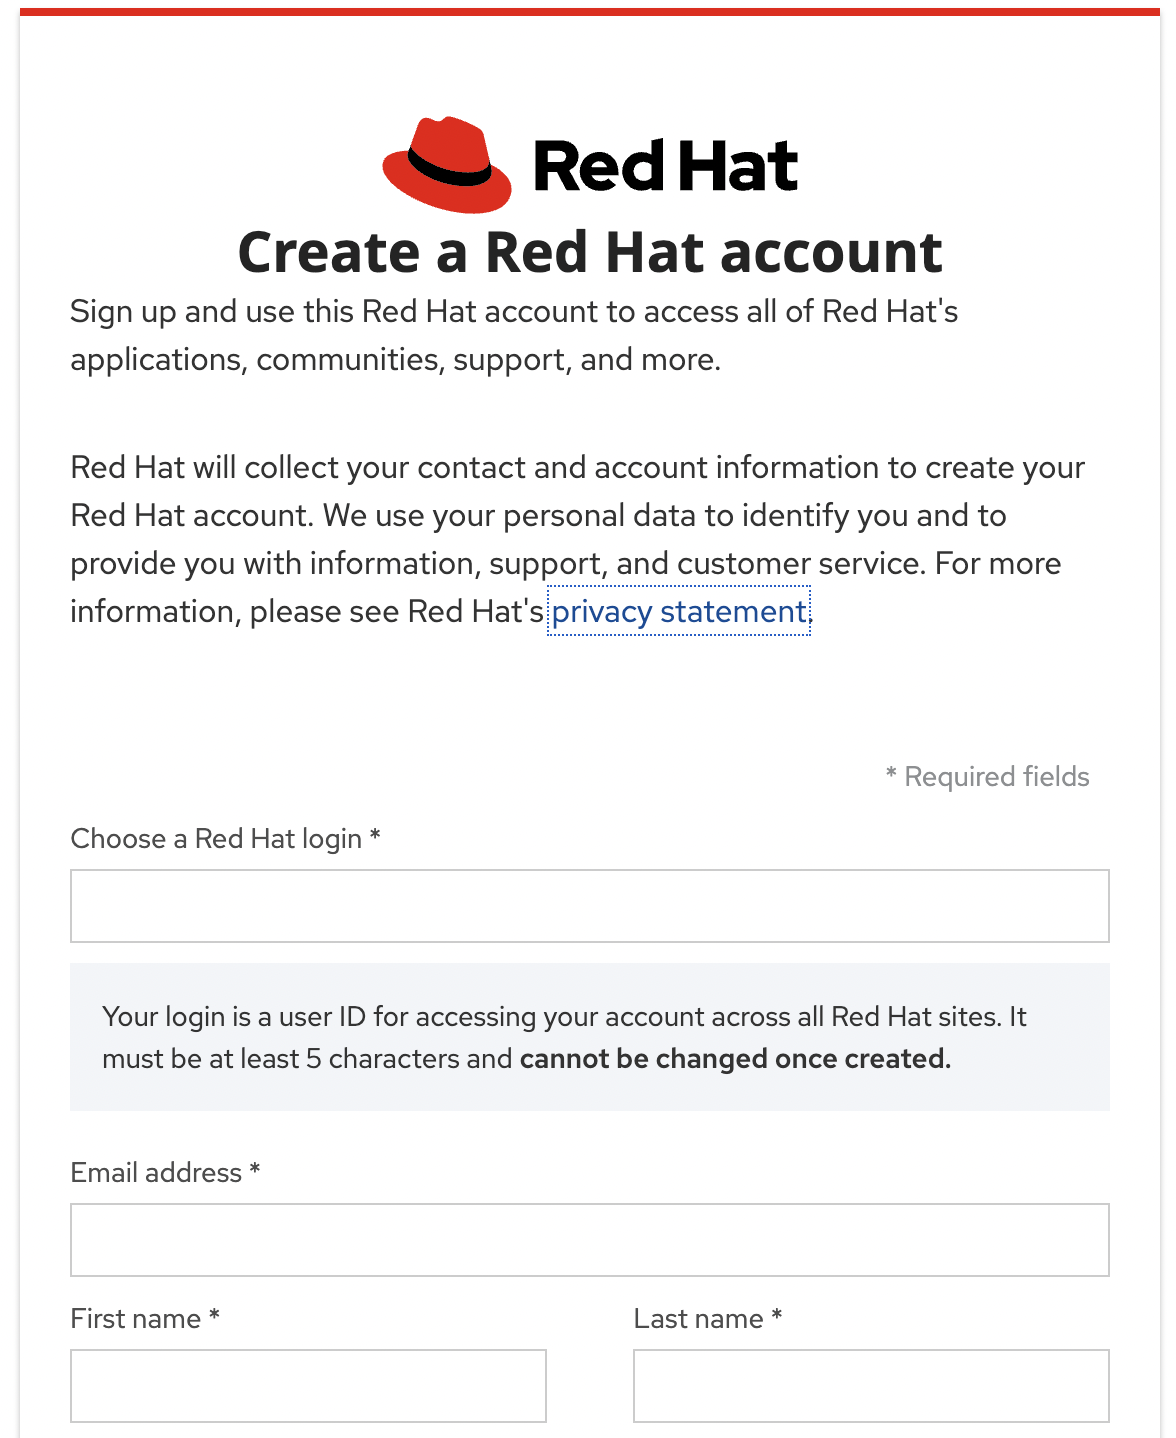
먼저, 가입해야 다운받을 수 있다.
1.1. 가입
developers.redhat.com/register에 가입 후 로그인한다.
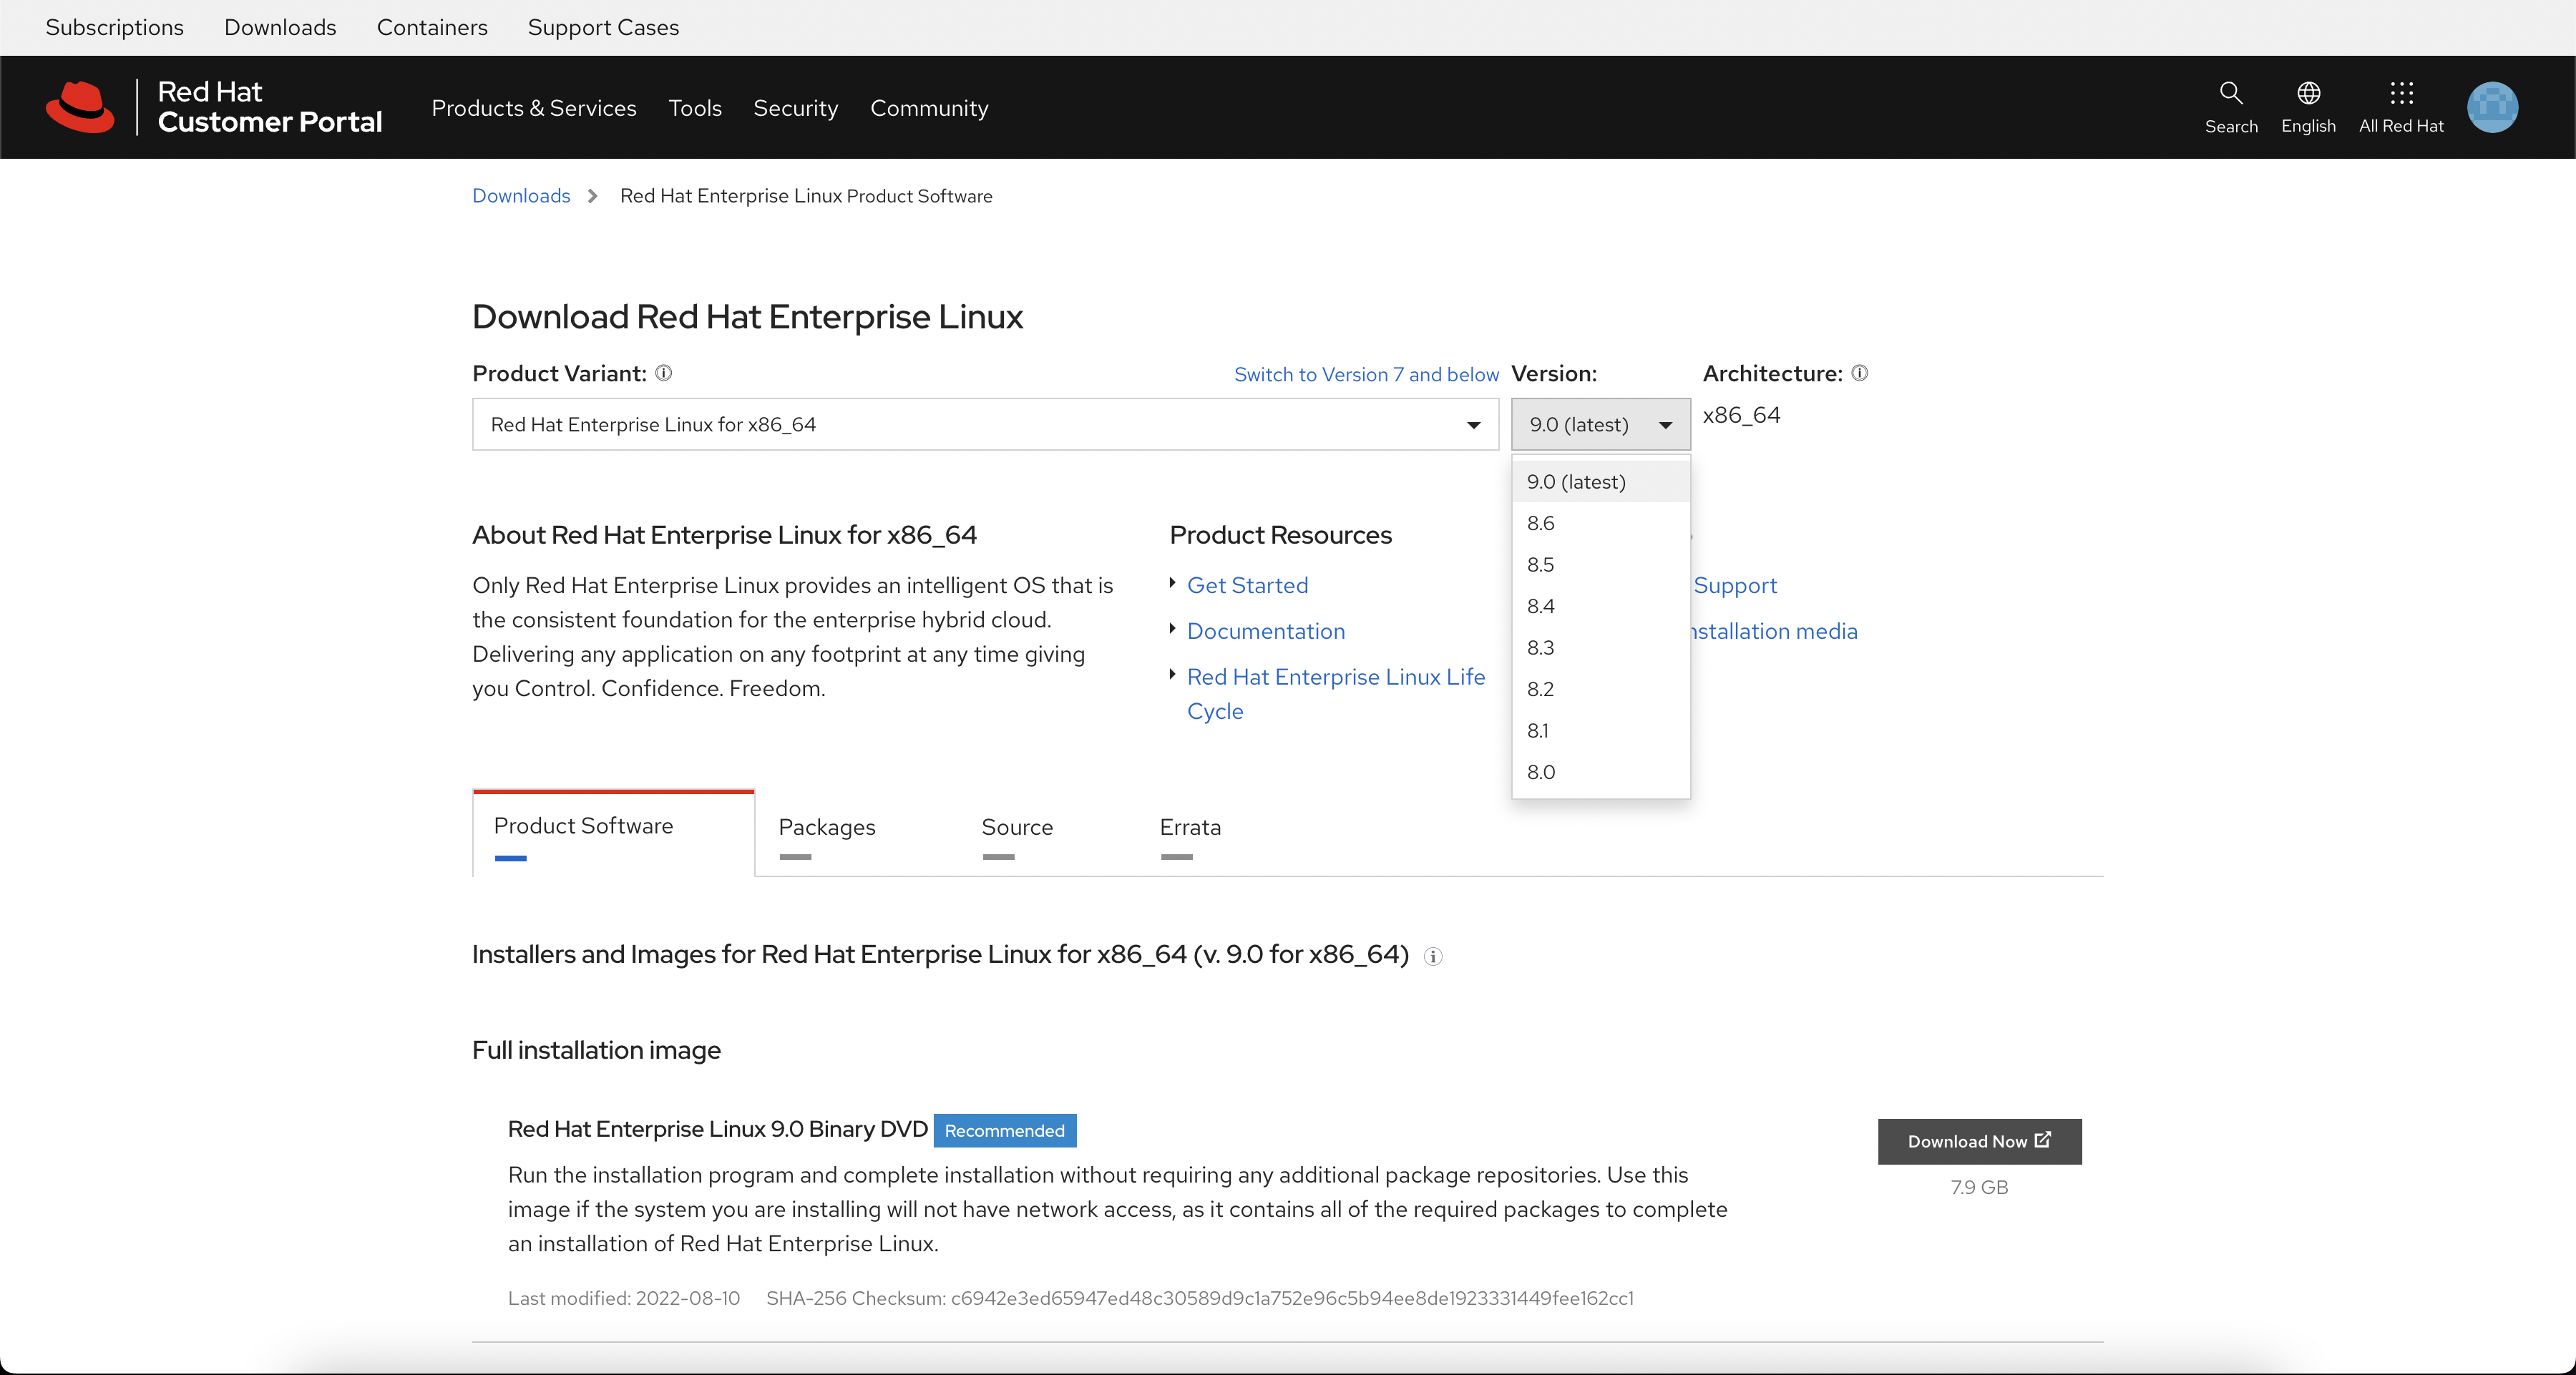
1.2. 다운
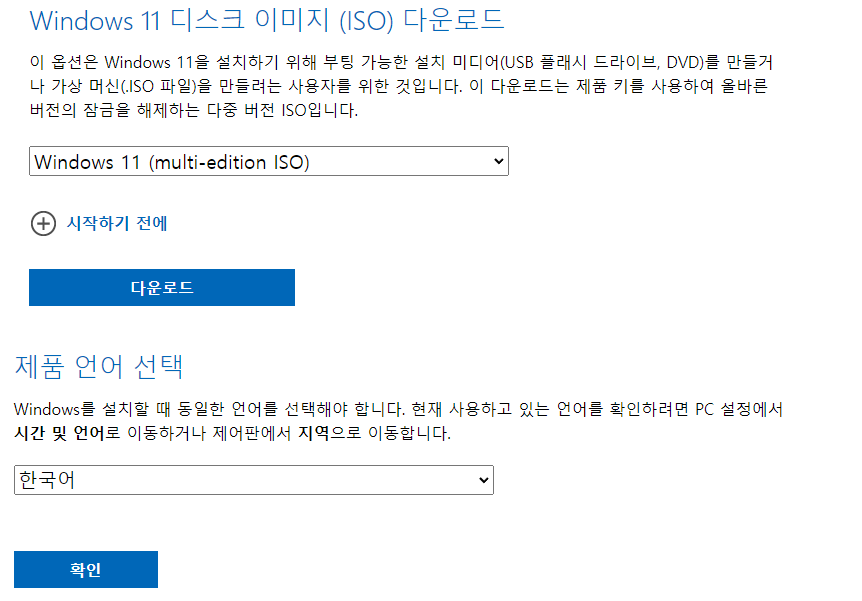
Red Hat Customer Portal에서 Product Variant와 버전을 선택하고 Red Hat Enterprise Linux x.y Binary DVD를 다운로드받으면 된다.
Product Variant 메뉴에서 x86_64 또는 ARM 64 등 본인 CPU 아키텍쳐에 맞게 설정하면 되며, 글 작성 시점 9.0이 최신 버전이었다.
1.2.1. 설치 ISO 이미지 유형
- Boot ISO (최소 부팅 이미지)
- 설치에 필요한 파일을 설치를 진행하면서 네트워크를 통해 다운받음
- Binary DVD (전체 설치 이미지) (Recommended!)
- 설치에 필요한 파일을 다운받아 놓고 설치를 진행 함
- BaseOS 및 AppStream 리포지토리가 포함됨
- 추가 리포지토리와 네트워크 연결이 필요 없음
2. 설치 미디어 생성
다운받은 ISO 이미지보다 큰 USB 드라이브가 필요하며, macOS, 윈도우, 리눅스에서 설치 미디어를 만들 수 있다.
경고: USB 드라이브의 모든 데이터는 삭제됩니다.
a) 윈도우 (WIP)
1.
b) macOS
-
USB 드라이브 연결 및 할당된 장치 아이디 확인
diskutil list 명령을 사용하여 장치 경로를 식별한다. 장치 경로의 형식은 /dev/diskX이며, X는 숫자다. 일반적으로 Disk 0은 OS X 복구 디스크이며 Disk 1은 기본 OS X 설치이다.
예를 들어, diskX와 같이 타겟 USB 드라이브에 해당하는 장치를 확인한다.
-
USB 드라이브 마운트 해제
diskutil unmountDisk /dev/diskX
diskX에 본인의 USB 드라이브 노드로 교체한다.
장치의 파티션 이름이 아니라, 전체 드라이브를 사용해야 한다.
예를 들어, diskX는 장치 이름이고, diskXsY는 장치 diskX의 파티션 이름이다.
-
USB 드라이브에 ISO 이미지 작성
sudo dd if=/image_directory/image.iso of=/dev/rdiskX bs=4M status=progress
참고:
- Mac OS X는 각 스토리지 장치에 블록 (/dev/disk) 및 문자 장치 (/dev/rdisk) 파일을 모두 제공하는데 /dev/rdisknumber 문자 장치에 이미지를 쓰는 것이 /dev/disknumber 블록 장치에 쓰는 것보다 빠르다.
/image_directory/image.iso 를 다운로드한 ISO 이미지 파일의 전체 경로로 교체하고, rdiskX는 위에서 확인한 장치 이름으로 교체한다.bs는 blocksize를 의미하며, status는 진행 상태를 출력한다.
이 예에서 ISO 이미지의 전체 경로는 /Users/testuser/Downloads/rhel-baseos-9.0-x86_64-dvd.iso 이며 장치 이름은 diskX를 사용한다.
sudo dd if=/Users/testuser/Downloads/rhel-baseos-9.0-x86_64-dvd.iso of=/dev/rdiskX bs=4M status=progress
c) RHEL
-
USB 드라이브 연결 및 할당된 장치 아이디 확인
예를 들어, sdd와 같이 타겟 USB 드라이브에 해당하는 장치를 확인한다.
-
USB 드라이브 마운트 해제
device에 본인의 USB 드라이브 노드로 교체한다.
장치의 파티션 이름이 아니라, 전체 드라이브를 사용해야 한다.
예를 들어, sdd는 장치 이름이고, sdd1은 장치 sdd의 파티션 이름이다.
-
USB 드라이브에 ISO 이미지 작성
sudo dd if=/image_directory/image.iso of=/dev/device bs=4M status=progress
참고:
/image_directory/image.iso 를 다운로드한 ISO 이미지 파일의 전체 경로로 교체하고, device는 위에서 확인한 장치 이름으로 교체한다.bs는 blocksize를 의미하며, status는 진행 상태를 출력한다.
이 예에서 ISO 이미지의 전체 경로는 /home/testuser/Downloads/rhel-baseos-9.0-x86_64-dvd.iso 이며 장치 이름은 sdd를 사용한다.
sudo dd if=/home/testuser/Downloads/rhel-baseos-9.0-x86_64-dvd.iso of=/dev/sdd bs=4M status=progress
3. 설치 부팅
설치 대상 컴퓨터에 USB를 연결한 상태에서 컴퓨터를 다시 시작한다.
BIOS/UEFI 설정 메뉴에서 부팅 우선순위를 설치 미디어(USB)로 설정해야 한다.
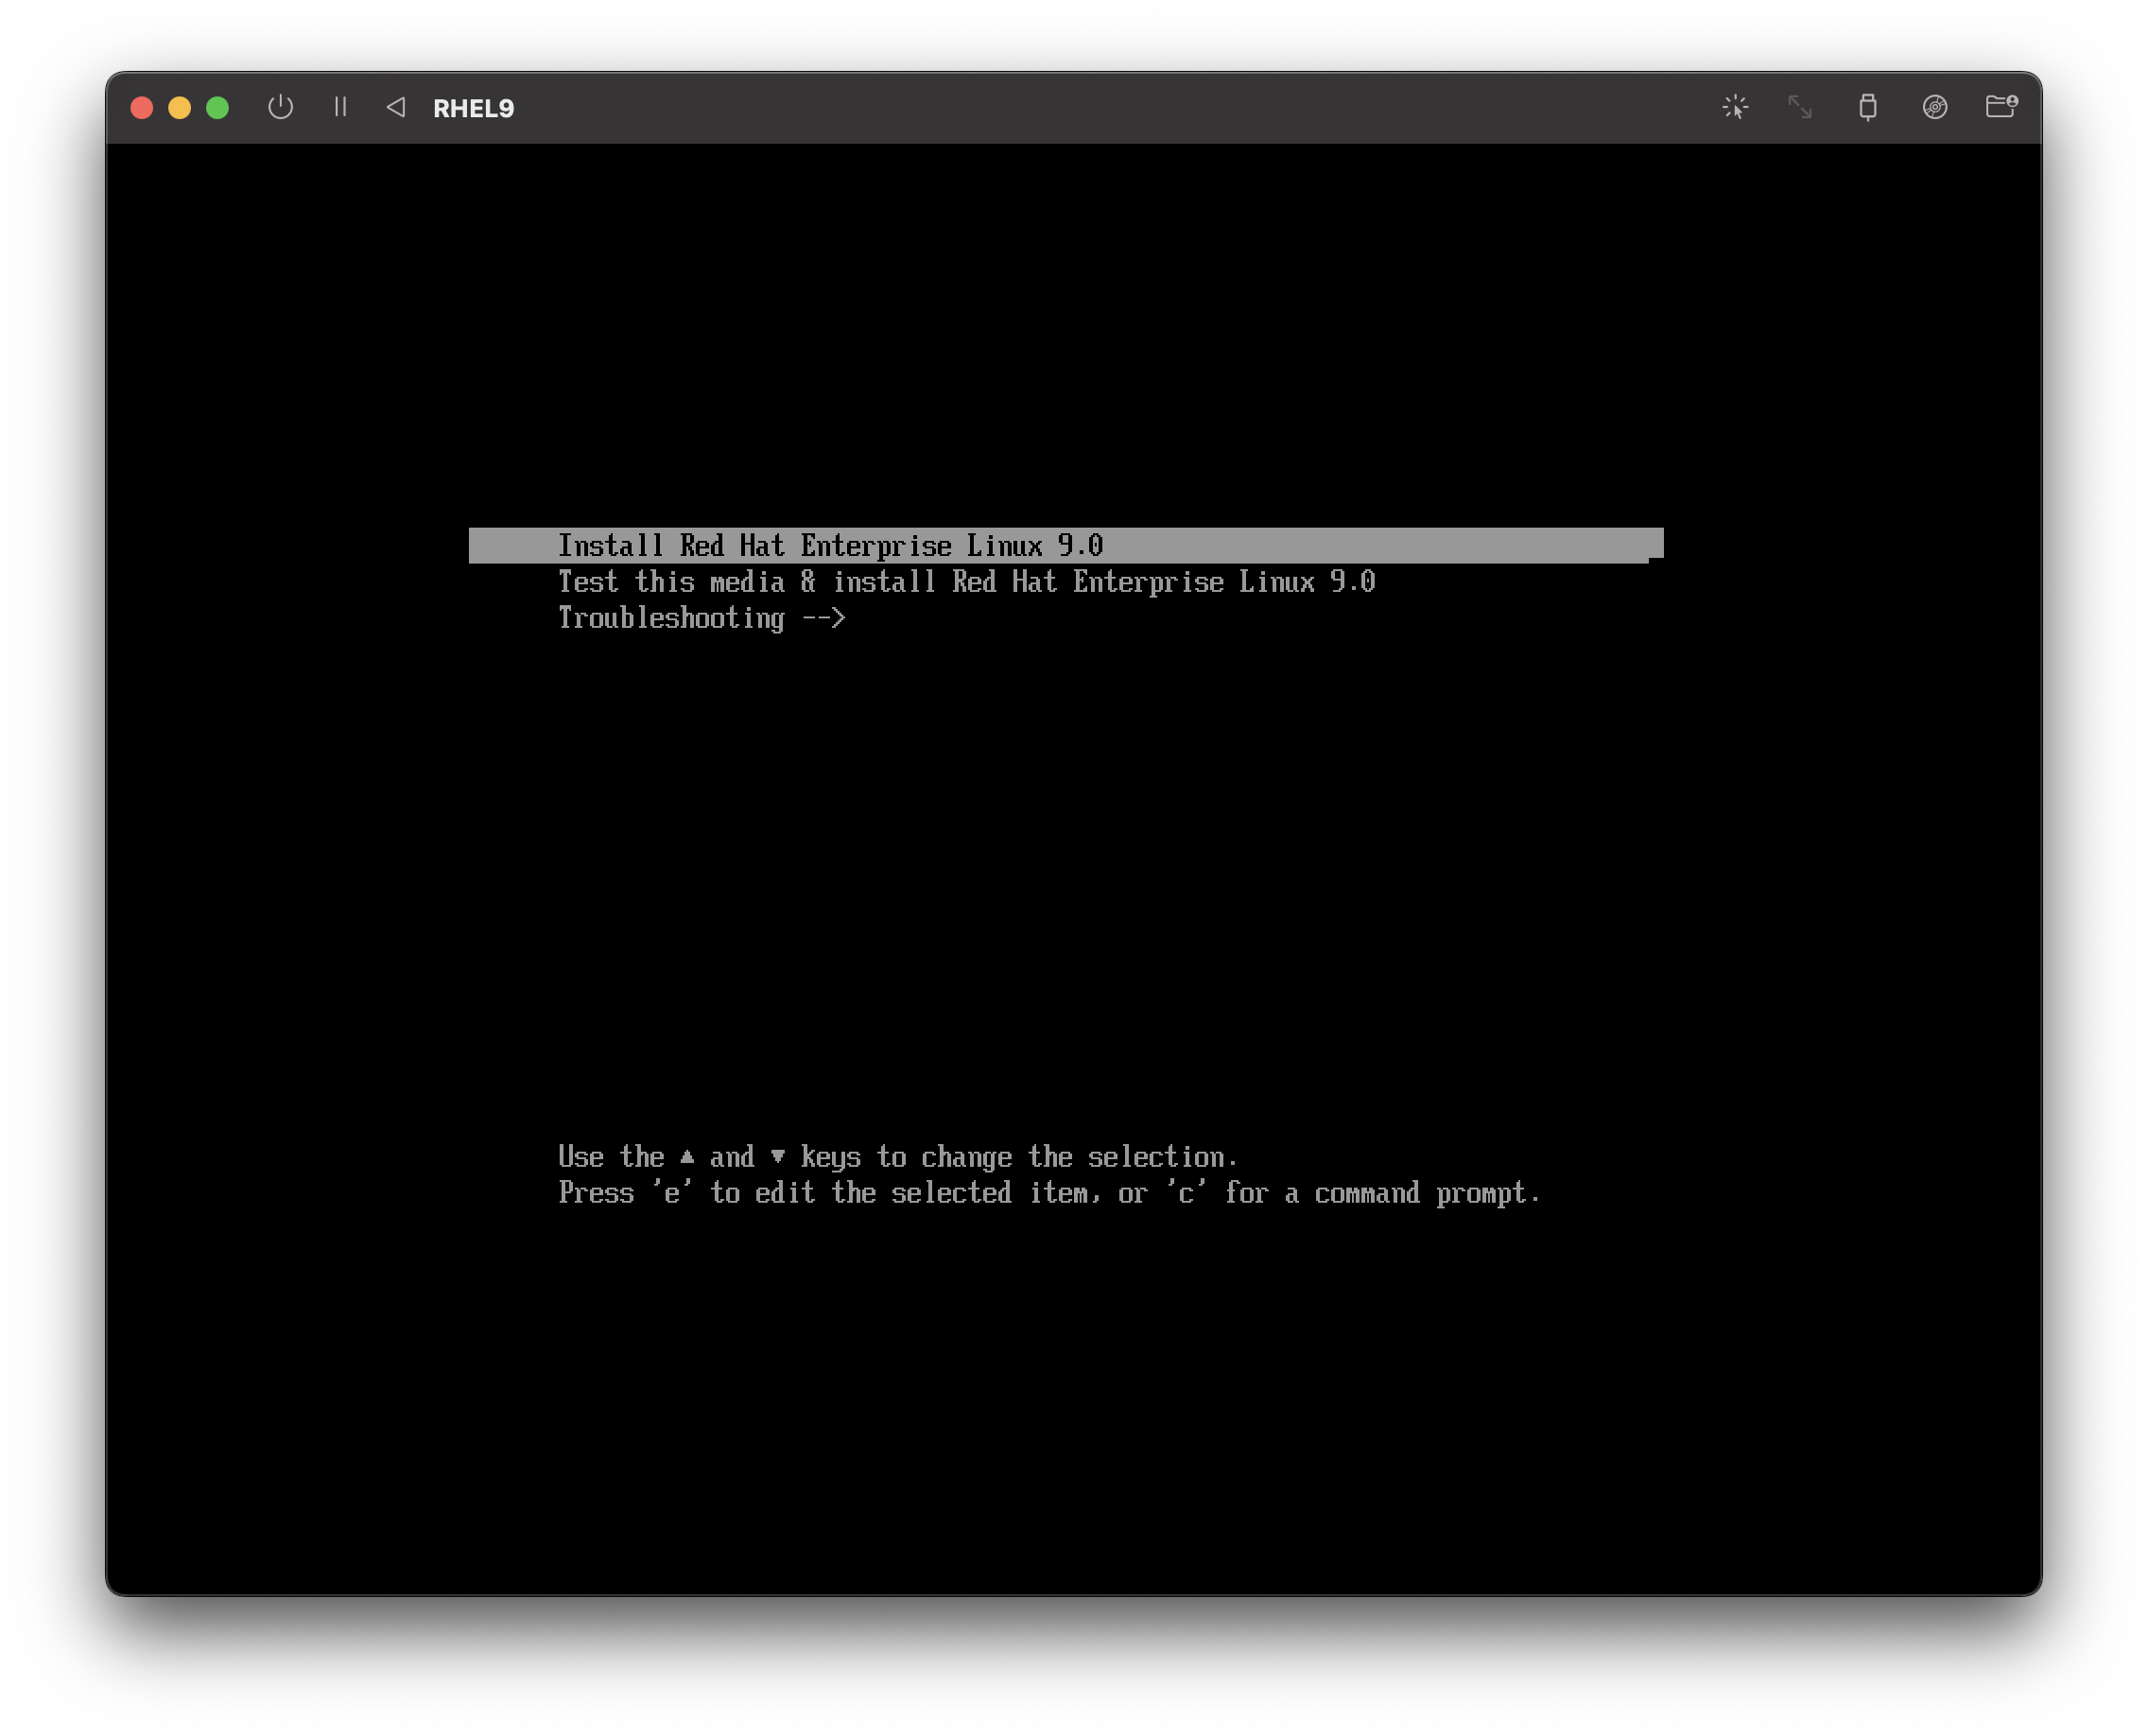
설치 USB가 정상적으로 인식되고 부팅 미디어가 로드된 경우 GRand Unified Bootloader 2 (GRUB2)에 부팅 메뉴가 표시된다.
| 부팅 메뉴 옵션 |
설명 |
| Install Red Hat Enterprise Linux X.Y |
그래픽 설치 프로그램 |
| Test this media & install Red Hat Enterprise Linux X.Y |
설치 미디어의 무결성을 확인 후 설치 |
| Troubleshooting |
다양한 설치 문제를 해결 |
4. 설치
GRUB2 부팅 메뉴 중에서 맨 위 Install Red Hat Enterprise Linux X.Y옵션을 선택하여 GUI 설치에 진입한다.
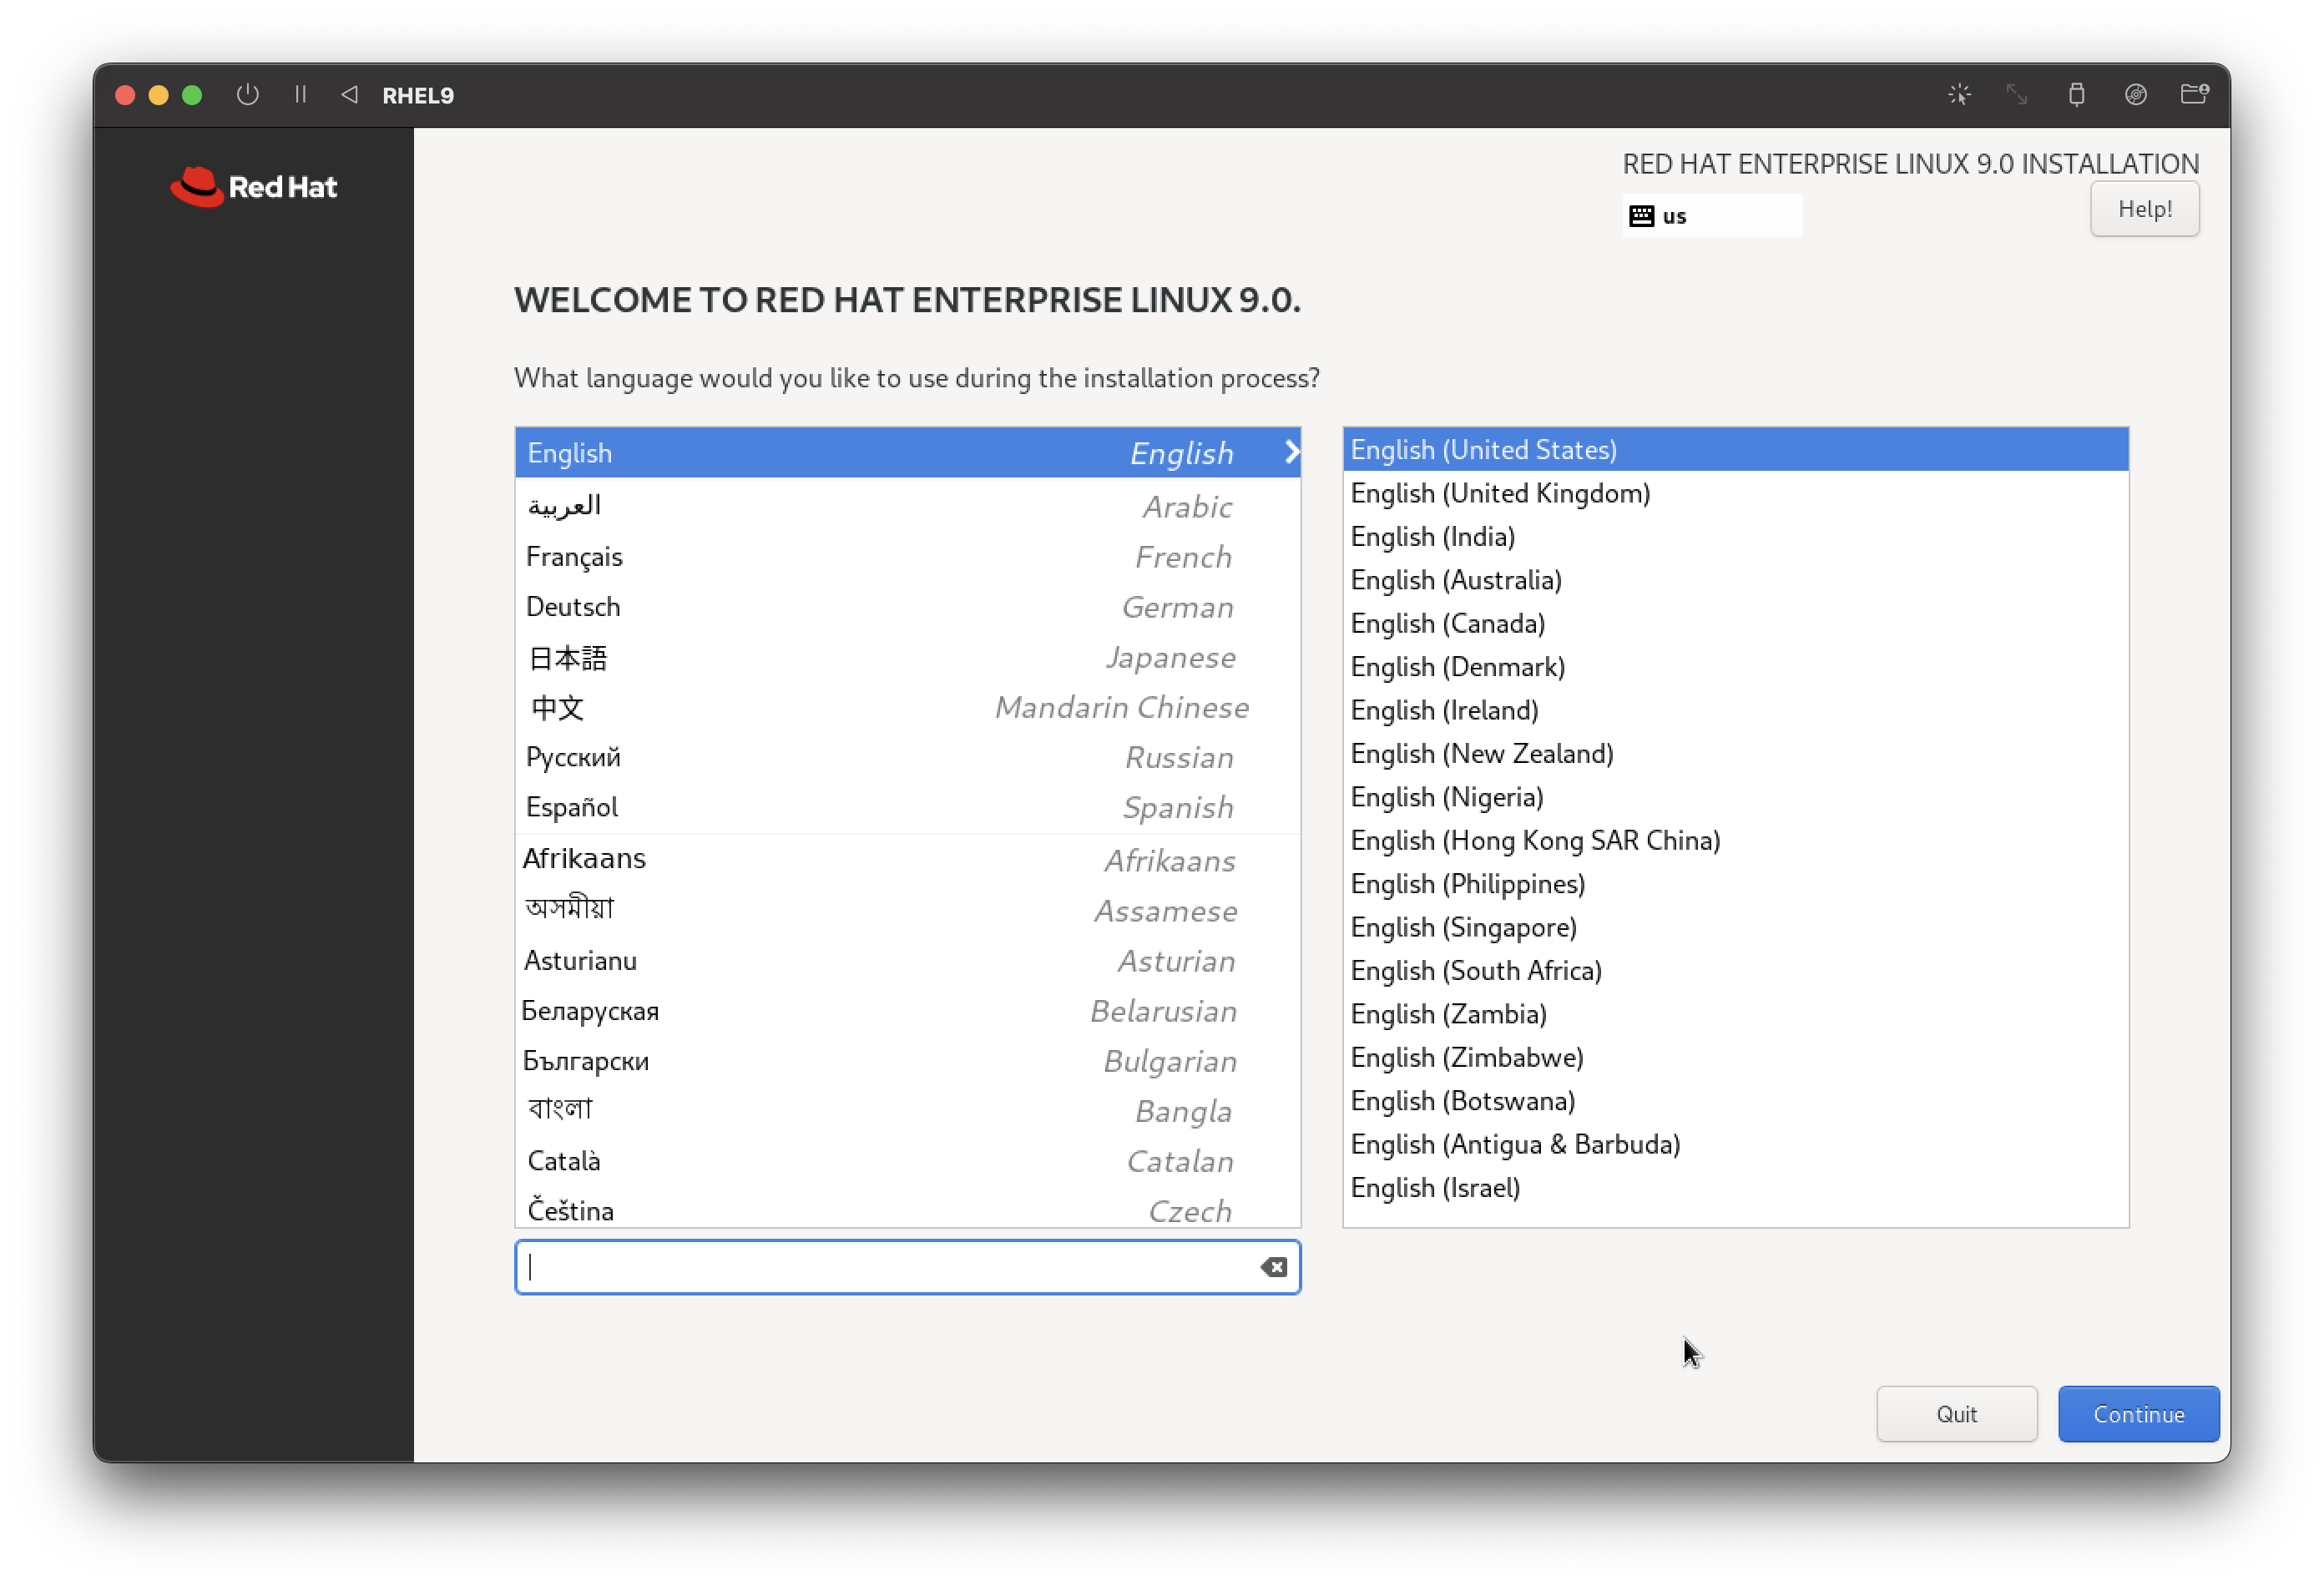
4.1. 설치 시작
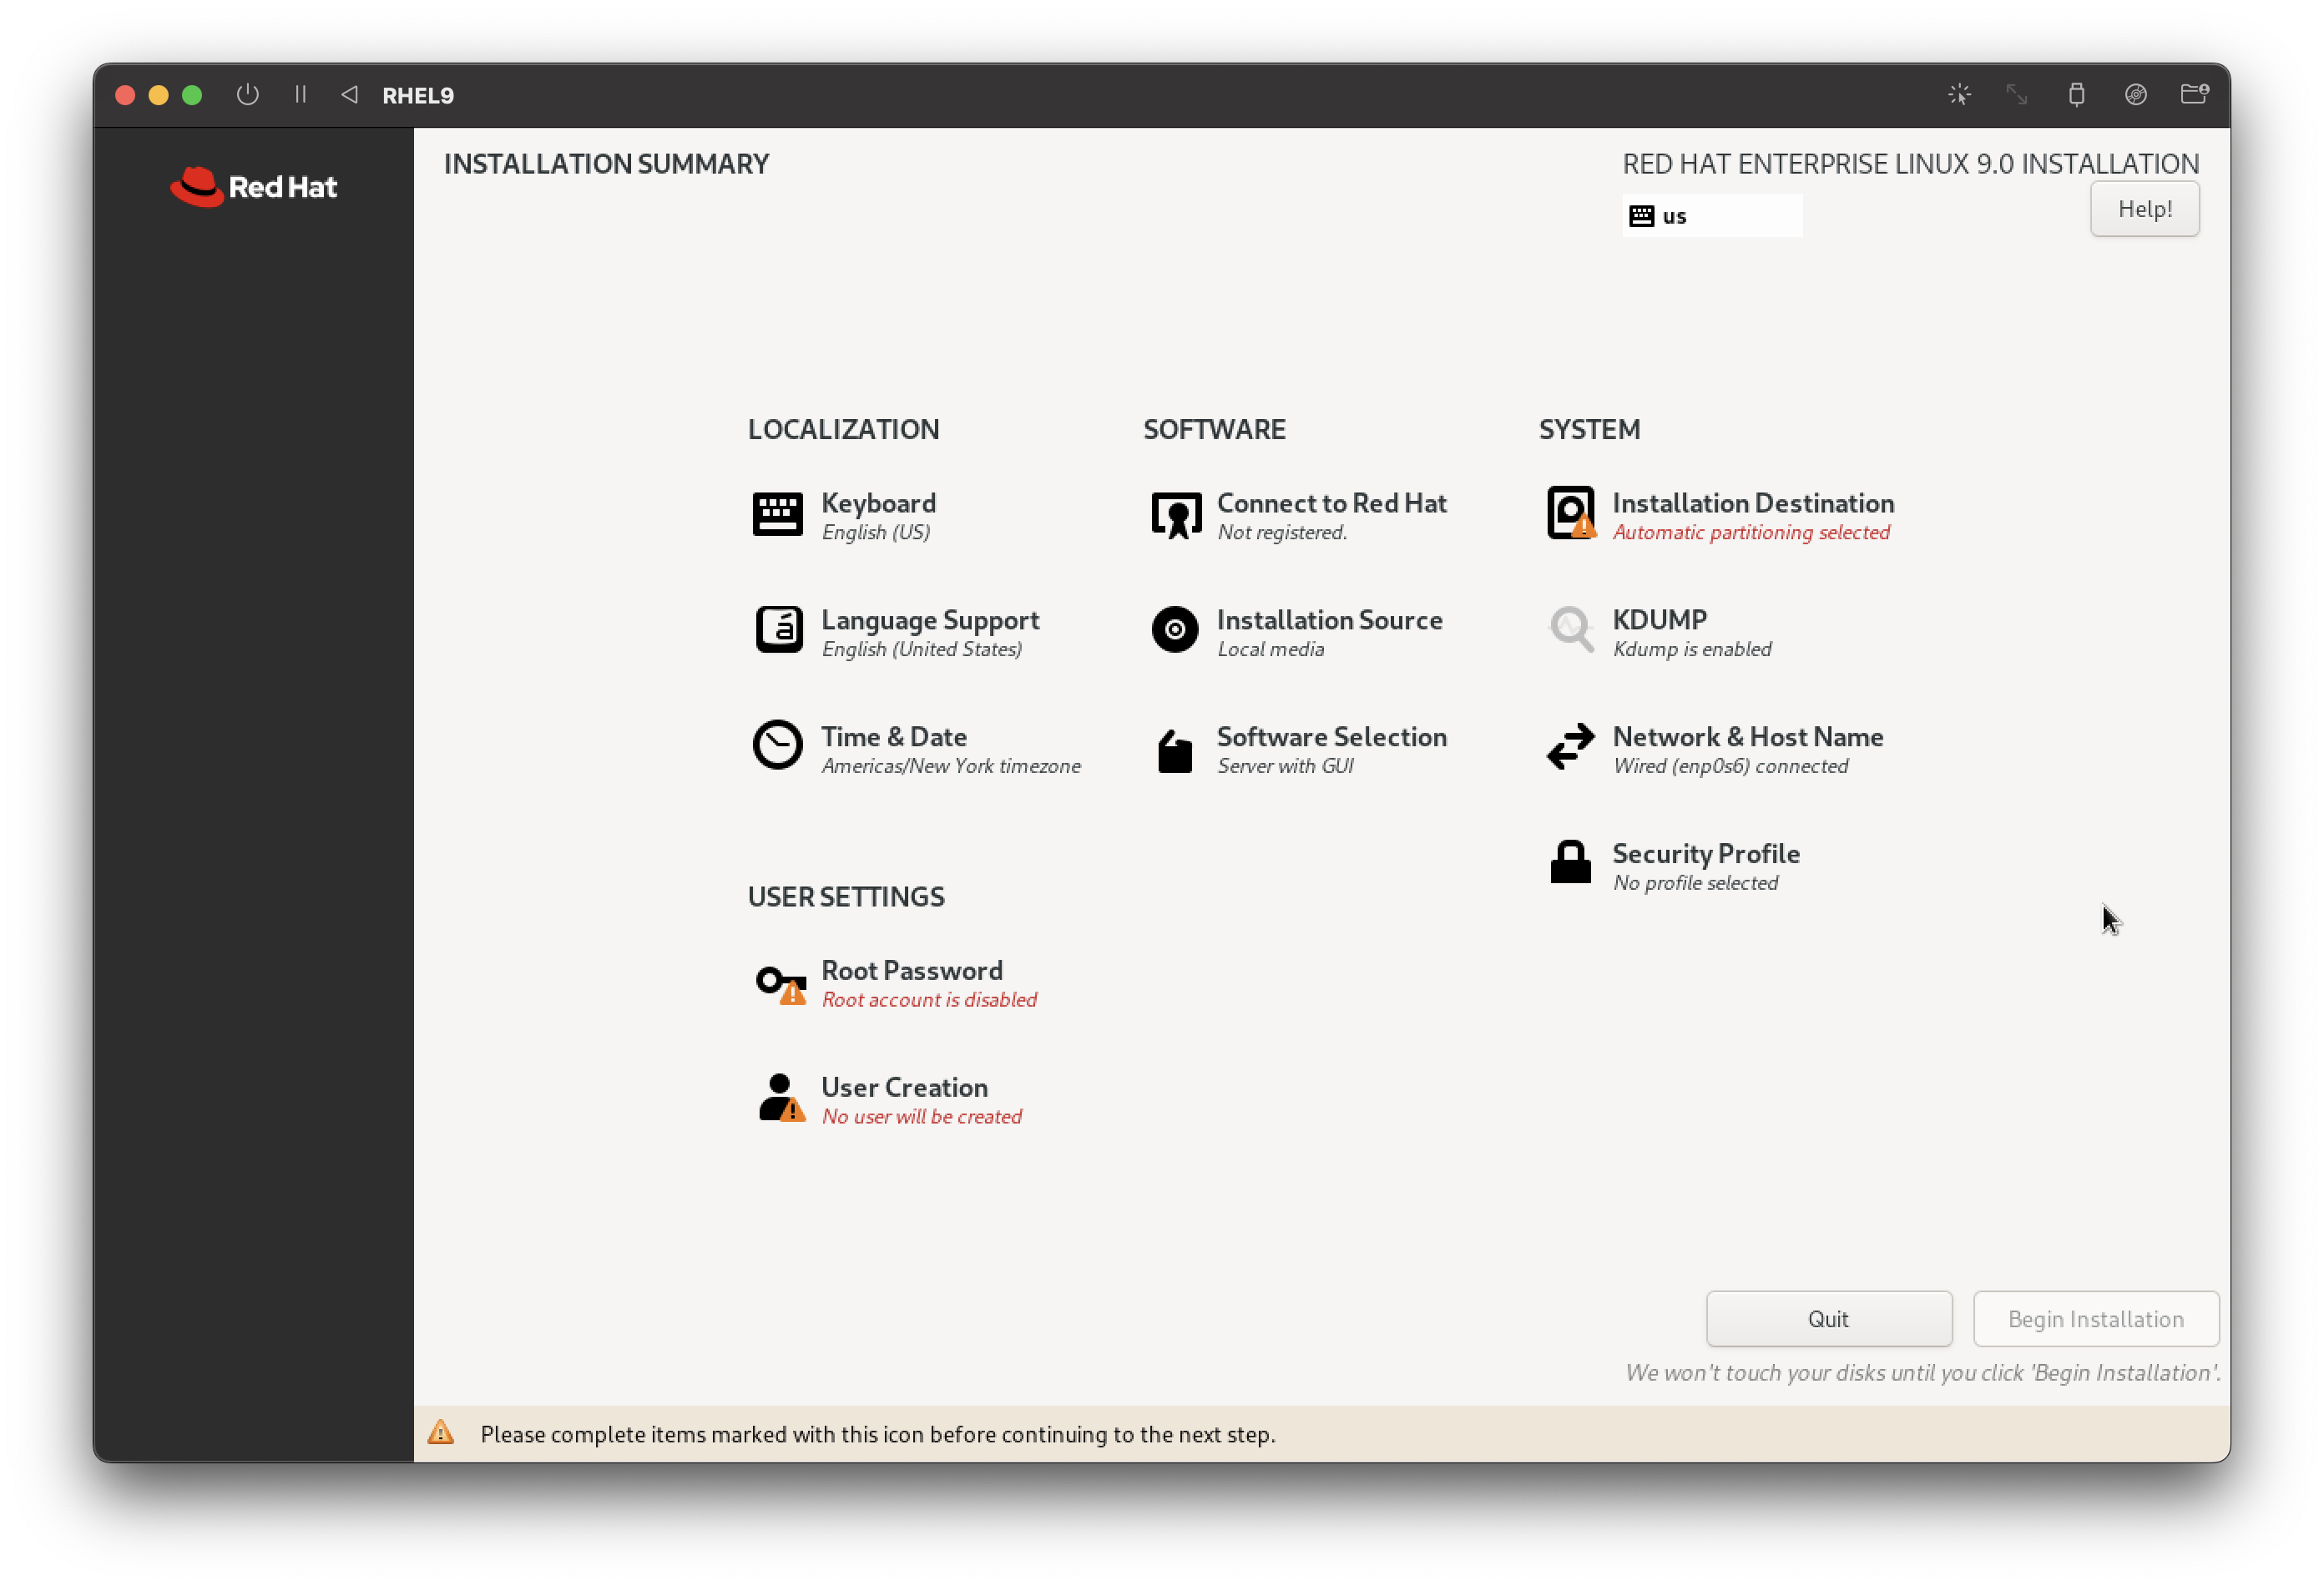
시작 창에서 언어와 위치를 선택하고 Installation Summary으로 이동한다.
4.2 현지화 옵션 구성
-
Localization > Keyboard
다른 언어의 키보드 레이아웃을 추가할 수 있는데, 설치 후에 한글을 별도 추가할 예정이므로 건너뛴다.
-
Localization > Language Support
시스템 지원 언어팩을 추가 할 수 있다. 한글 언어팩이 필요하면 검색창에 korean 검색 후 한국어를 추가하면 된다.
-
Localization > Time & Date
지역을 선택하여 타임존을 선택할 수 있다. NTP를 활성화하면 네트워크를 통해 시간이 자동 설정된다.
4.3. 시스템 옵션 구성
-
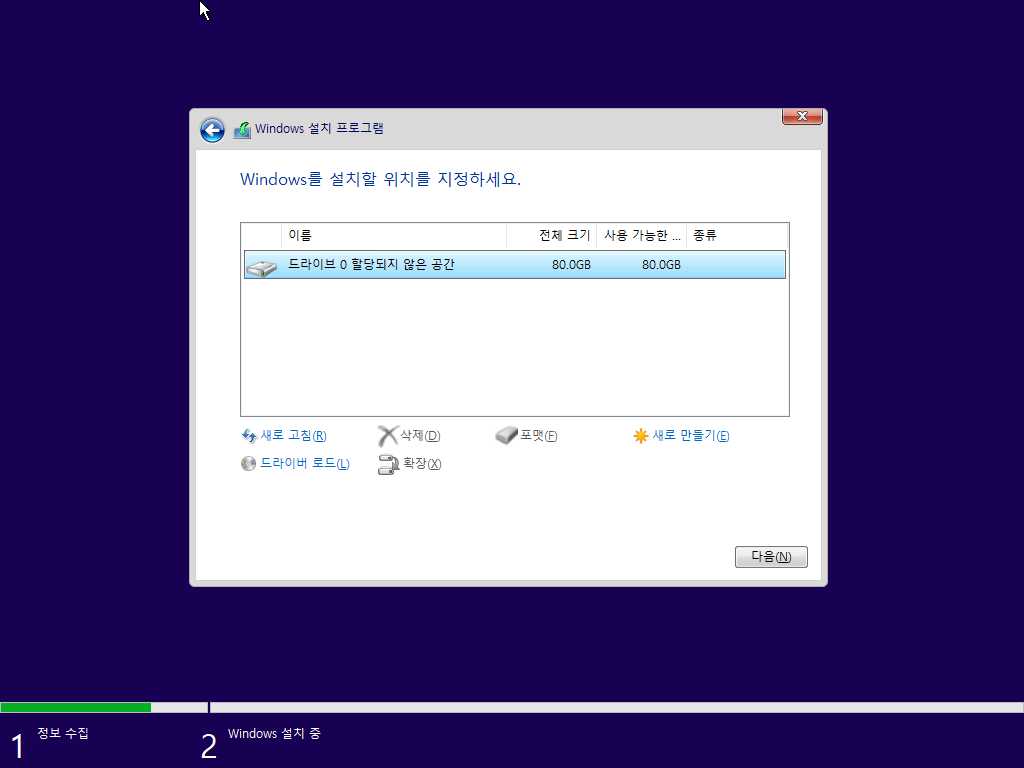
System > Installation Destination
로컬 표준 디스크 창에서 설치 대상 디스크 선택
수동 파티션 설정 (WIP)
-
System > KDUMP (커널 크래시 덤프)
시스템 오류가 발생했을 때 시스템 메모리의 콘텐츠를 캡처하고, 시스템 오류 원인을 찾기 위해 분석할 수 있다.
Enable, Auto 선택.
-
System > Network & Host Name (네트워크 및 호스트 이름 옵션 구성)
이더넷 혹은 와이파이를 활성화하여 인터넷에 연결한다.
4.4. 소프트웨어 옵션 구성
-
Software > Connect to Red Hat
설치 중에 시스템을 레드햇에 등록하는 옵션인데, 설치 완료 후에 등록 예정이므로 건너뛴다.
-
Software > Installation Source
설치에 필요한 파일 위치를 지정하는데, Binary DVD는 필요한 파일을 모두 포함하고 있으므로 인터넷에 연결할 필요도 없고, 다른 레포지토리를 추가할 필요도 없다.
-
Software > Software Selection
환경 유형과 추가 소프트웨어를 설정 할 수 있다.
Base Environment에서 Server with GUI 선택.
Additional software에서 필요한 소프트웨어 그룹을 선택. 설치 완료 후에도 추가 할 수 있다.
4.5 사용자 설정
-
User Settings > Root Password
root 계정에 사용할 암호 입력.
"Allow root SSH login with password" 활성화.
-
User Settings > User Creation
root 계정 외에 메인으로 사용할 유저 생성을 추천한다.
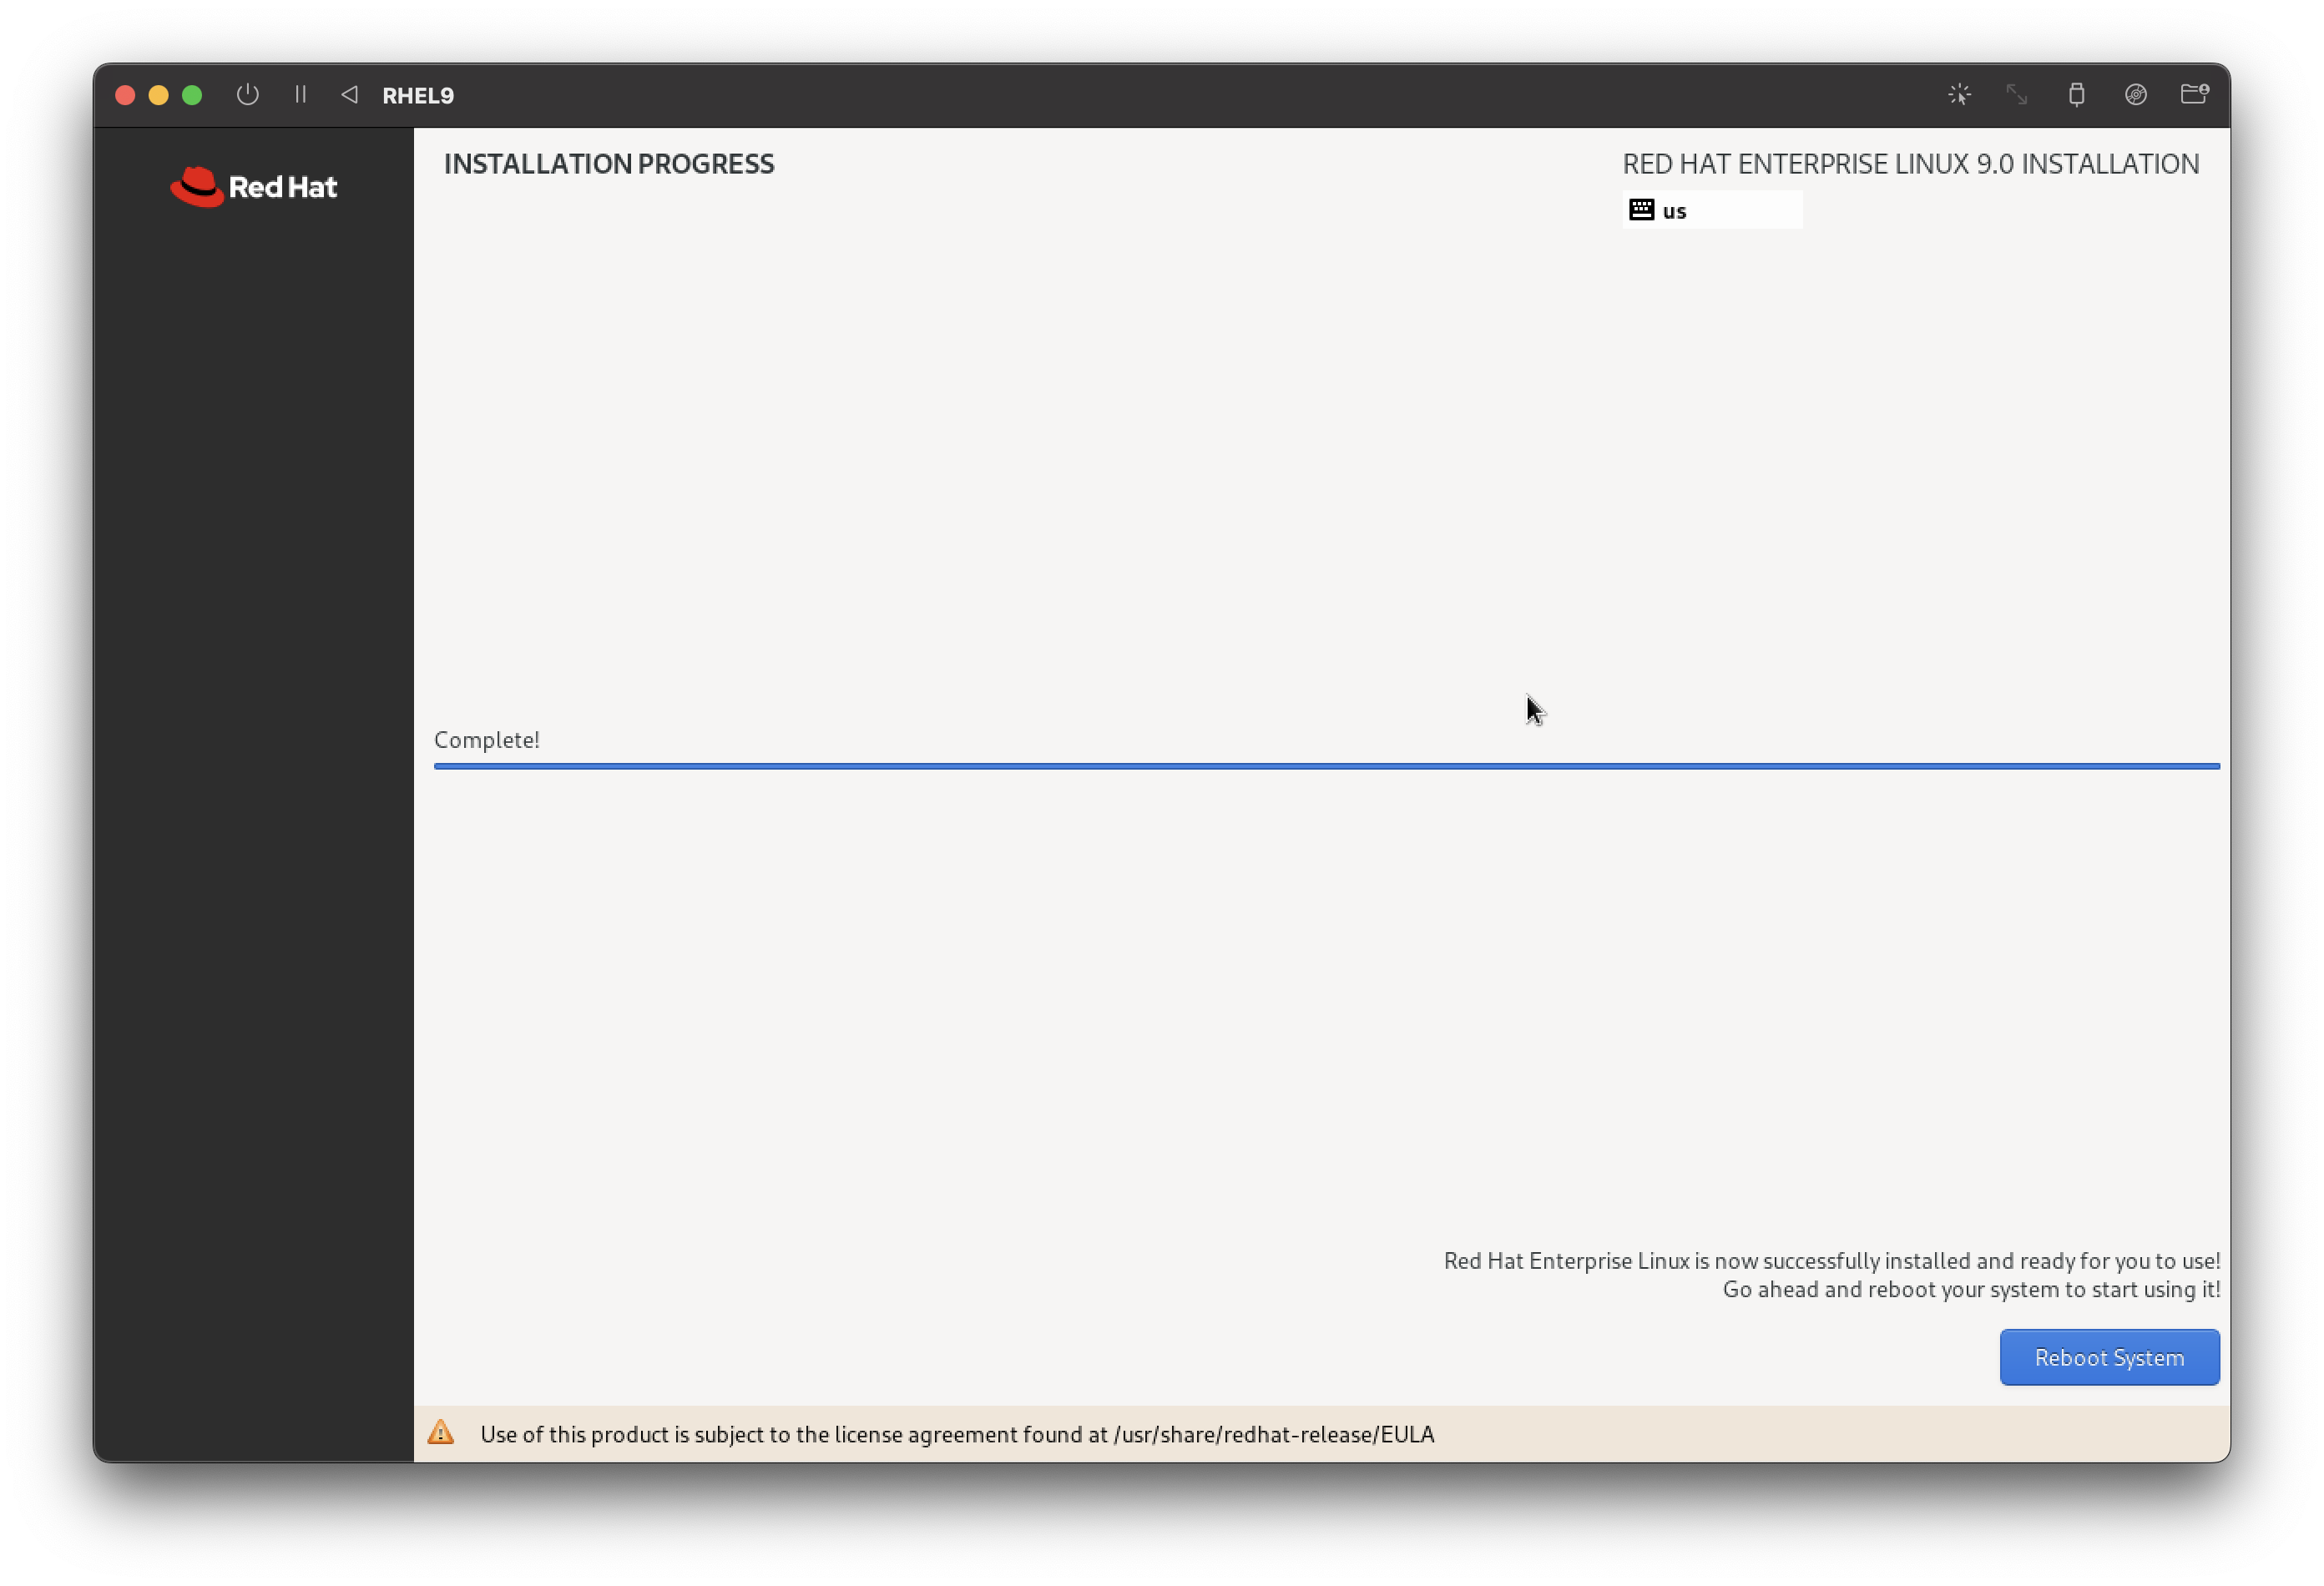
4.6 설치 마무리
-
[Begin Installation] > [Reboot]
-
Initial Setup 창에서 라이센스 계약에 동의하고 시스템을 등록.
5. Post-installation: RHEL 시스템 등록
RHEL를 등록해야 레드햇 레포지토리 사용 등 정상적인 사용이 가능하다.
RHEL 설치 중에 등록하지 않았거나, 등록 정보를 변경할 때 이 방법으로 등록할 수 있다.
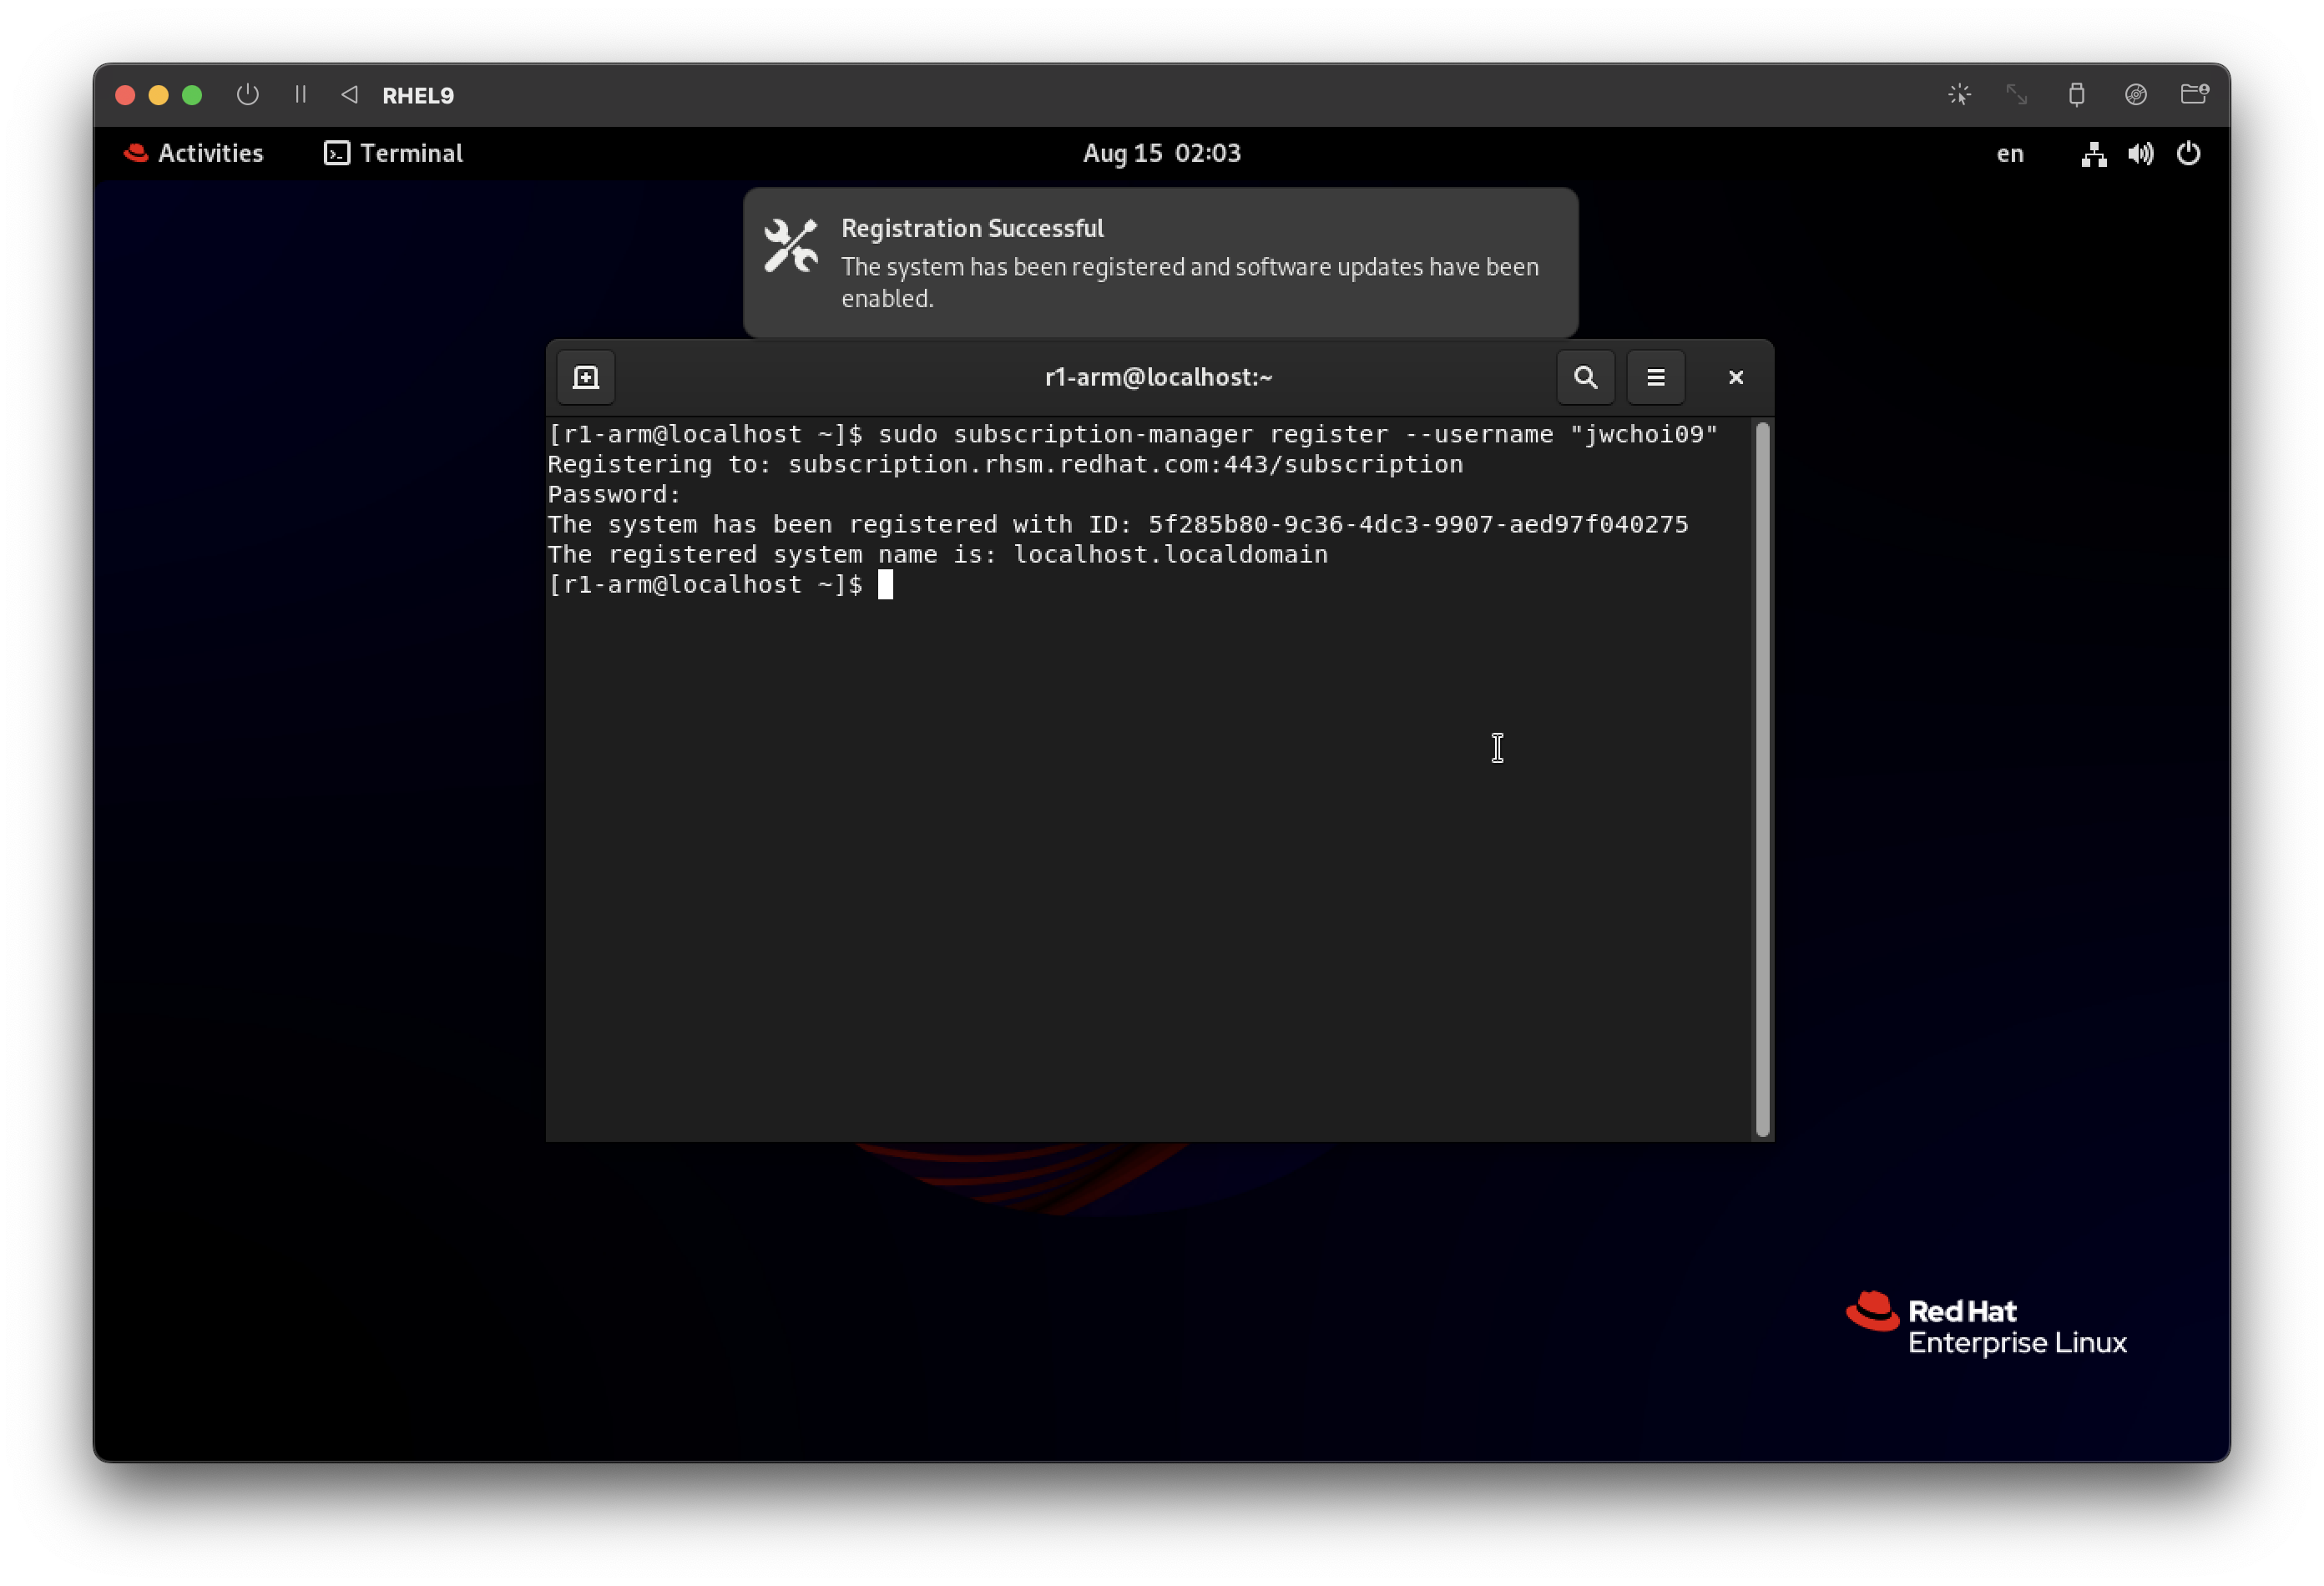
5.1. 터미널에 레드햇 포털 사용자 이름과 암호를 사용하여 RHEL 등록
sudo subscription-manager register --username "username"
비밀번호도 --password로 입력할 수 있지만, 그렇게 할 경우 명령어 히스토리에 비밀번호가 남기 때문에 위 방법으로 유출 위험성을 최소화할 수 있다.
시스템이 성공적으로 등록되면 다음과 유사한 출력이 표시된다:
# The system has been registered with ID: 123456abcdef
# The registered system name is: localhost.localdomain
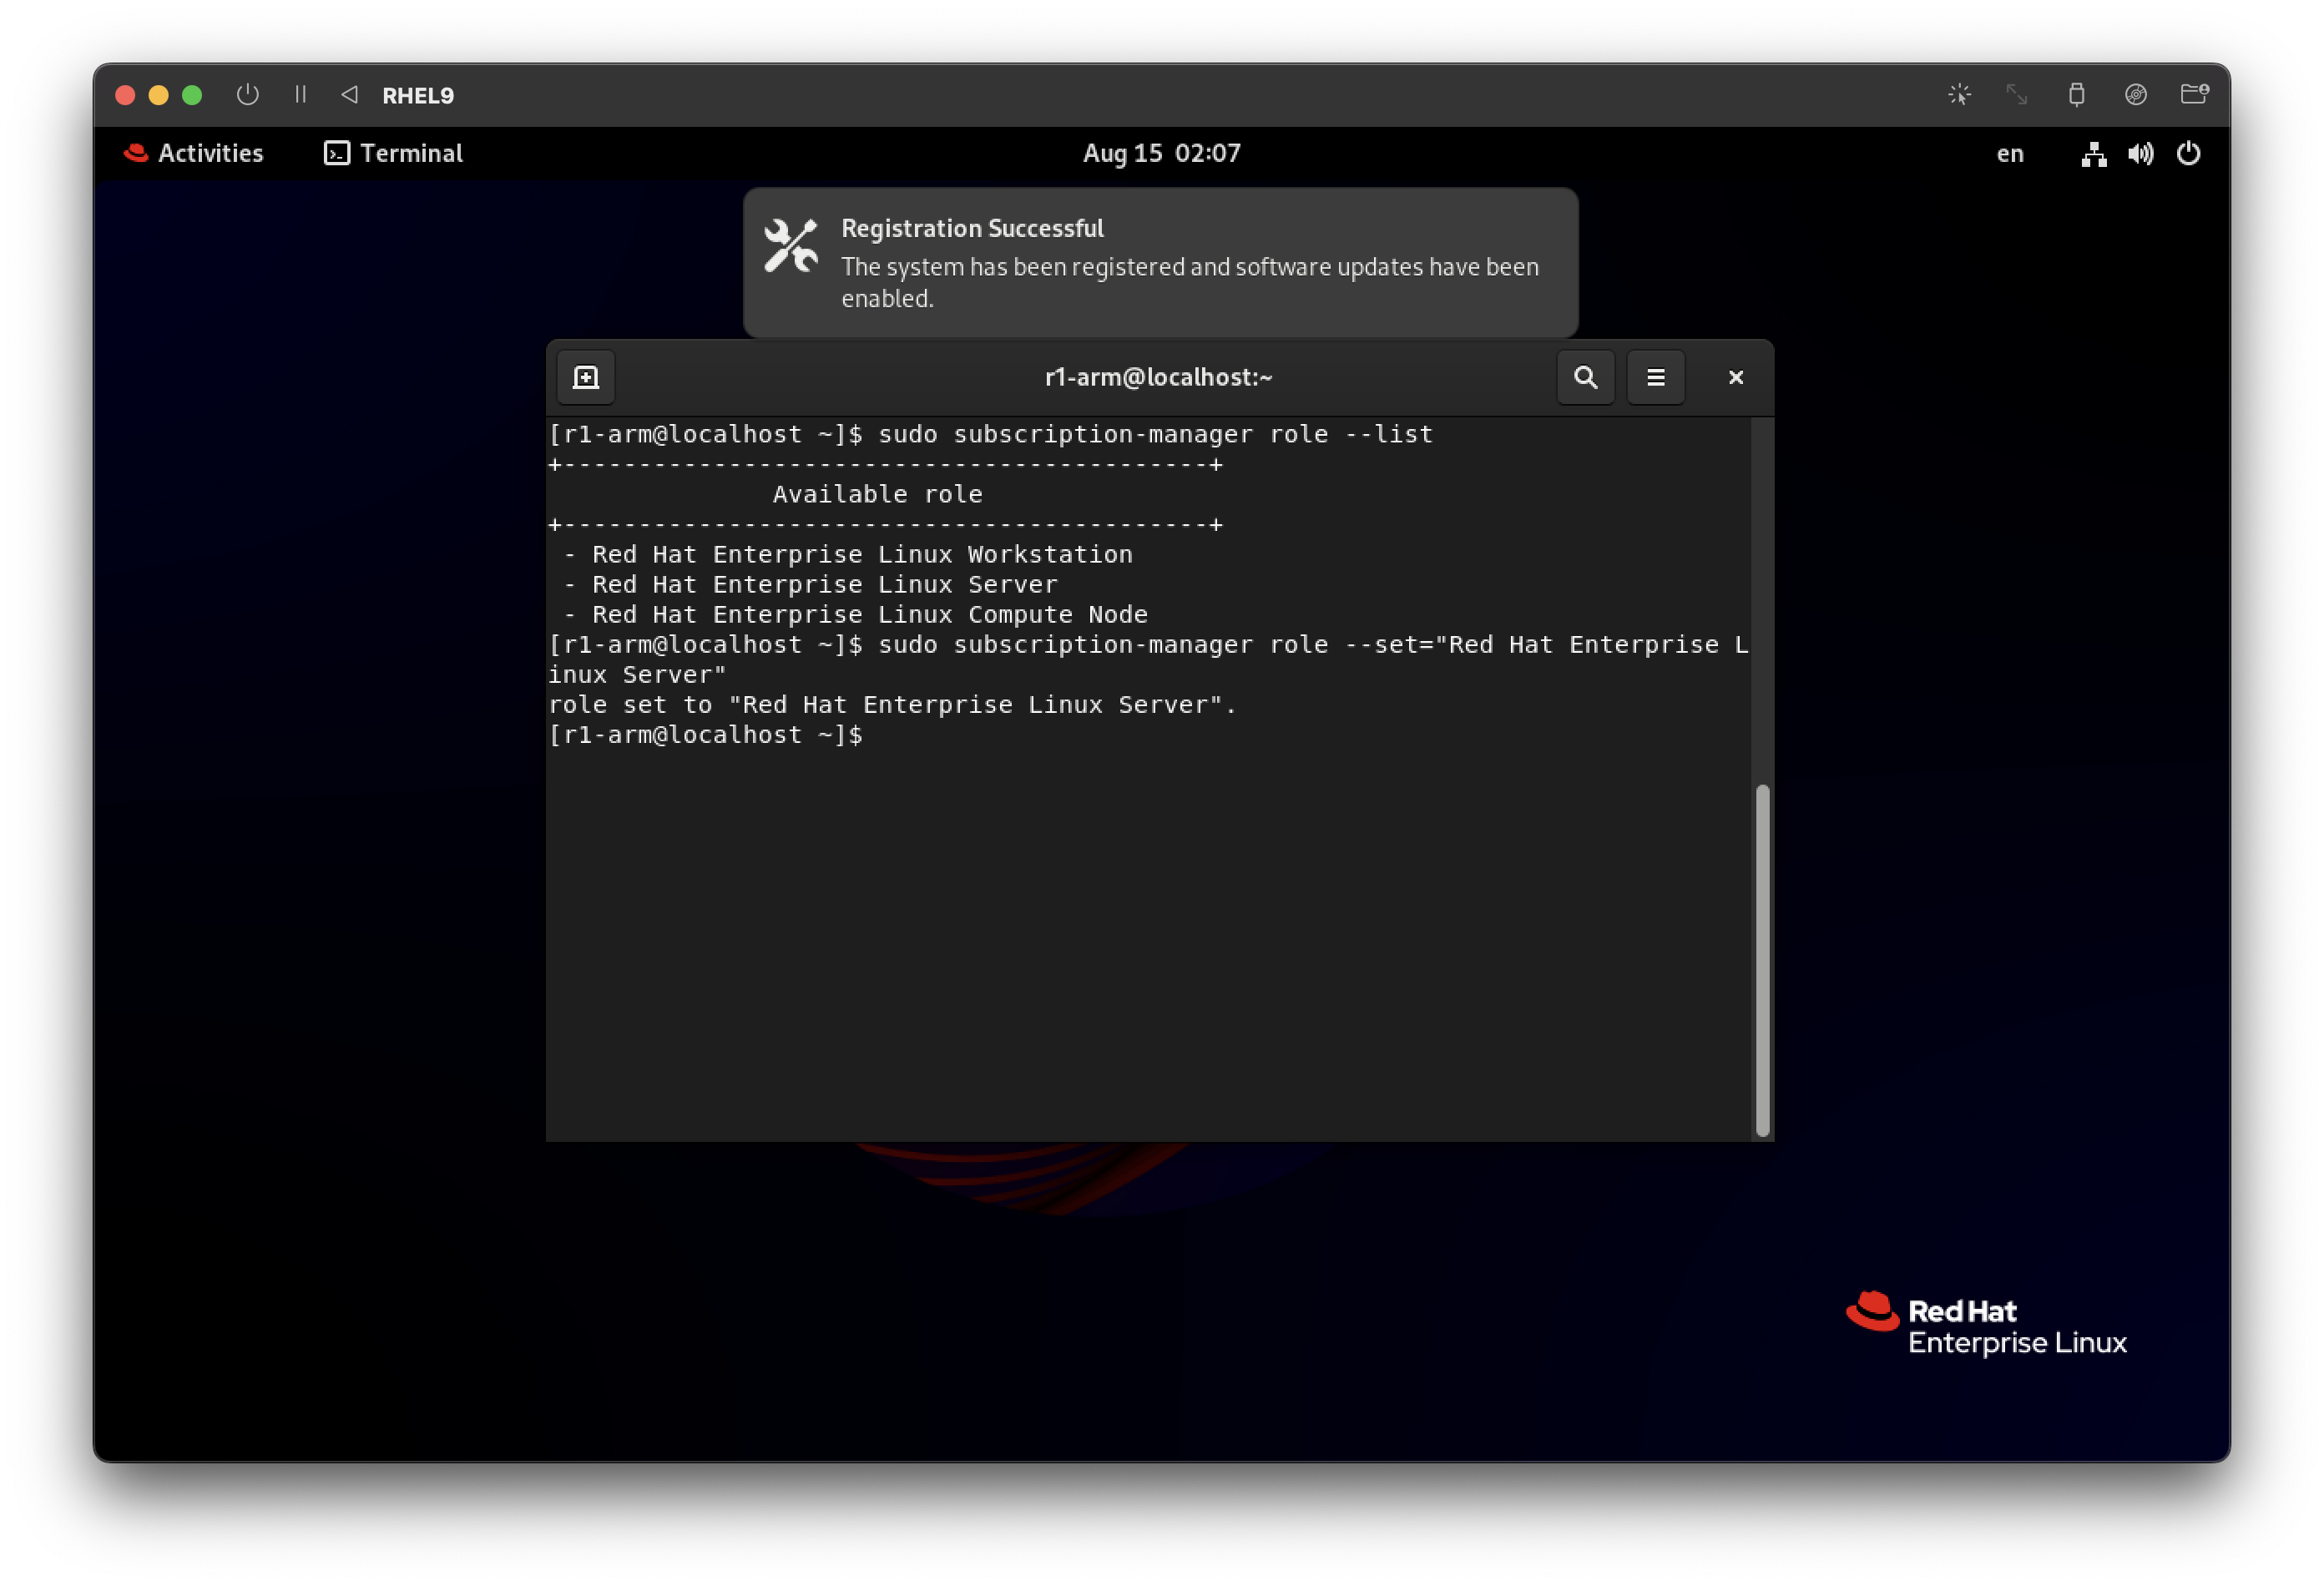
5.2 시스템 역할, 서비스 수준 계약(SLA), 용도 설정
5.2.1 시스템 역할 설정
subscription-manager syspurpose role --list
subscription-manager syspurpose role --set="Red Hat Enterprise Linux Server"
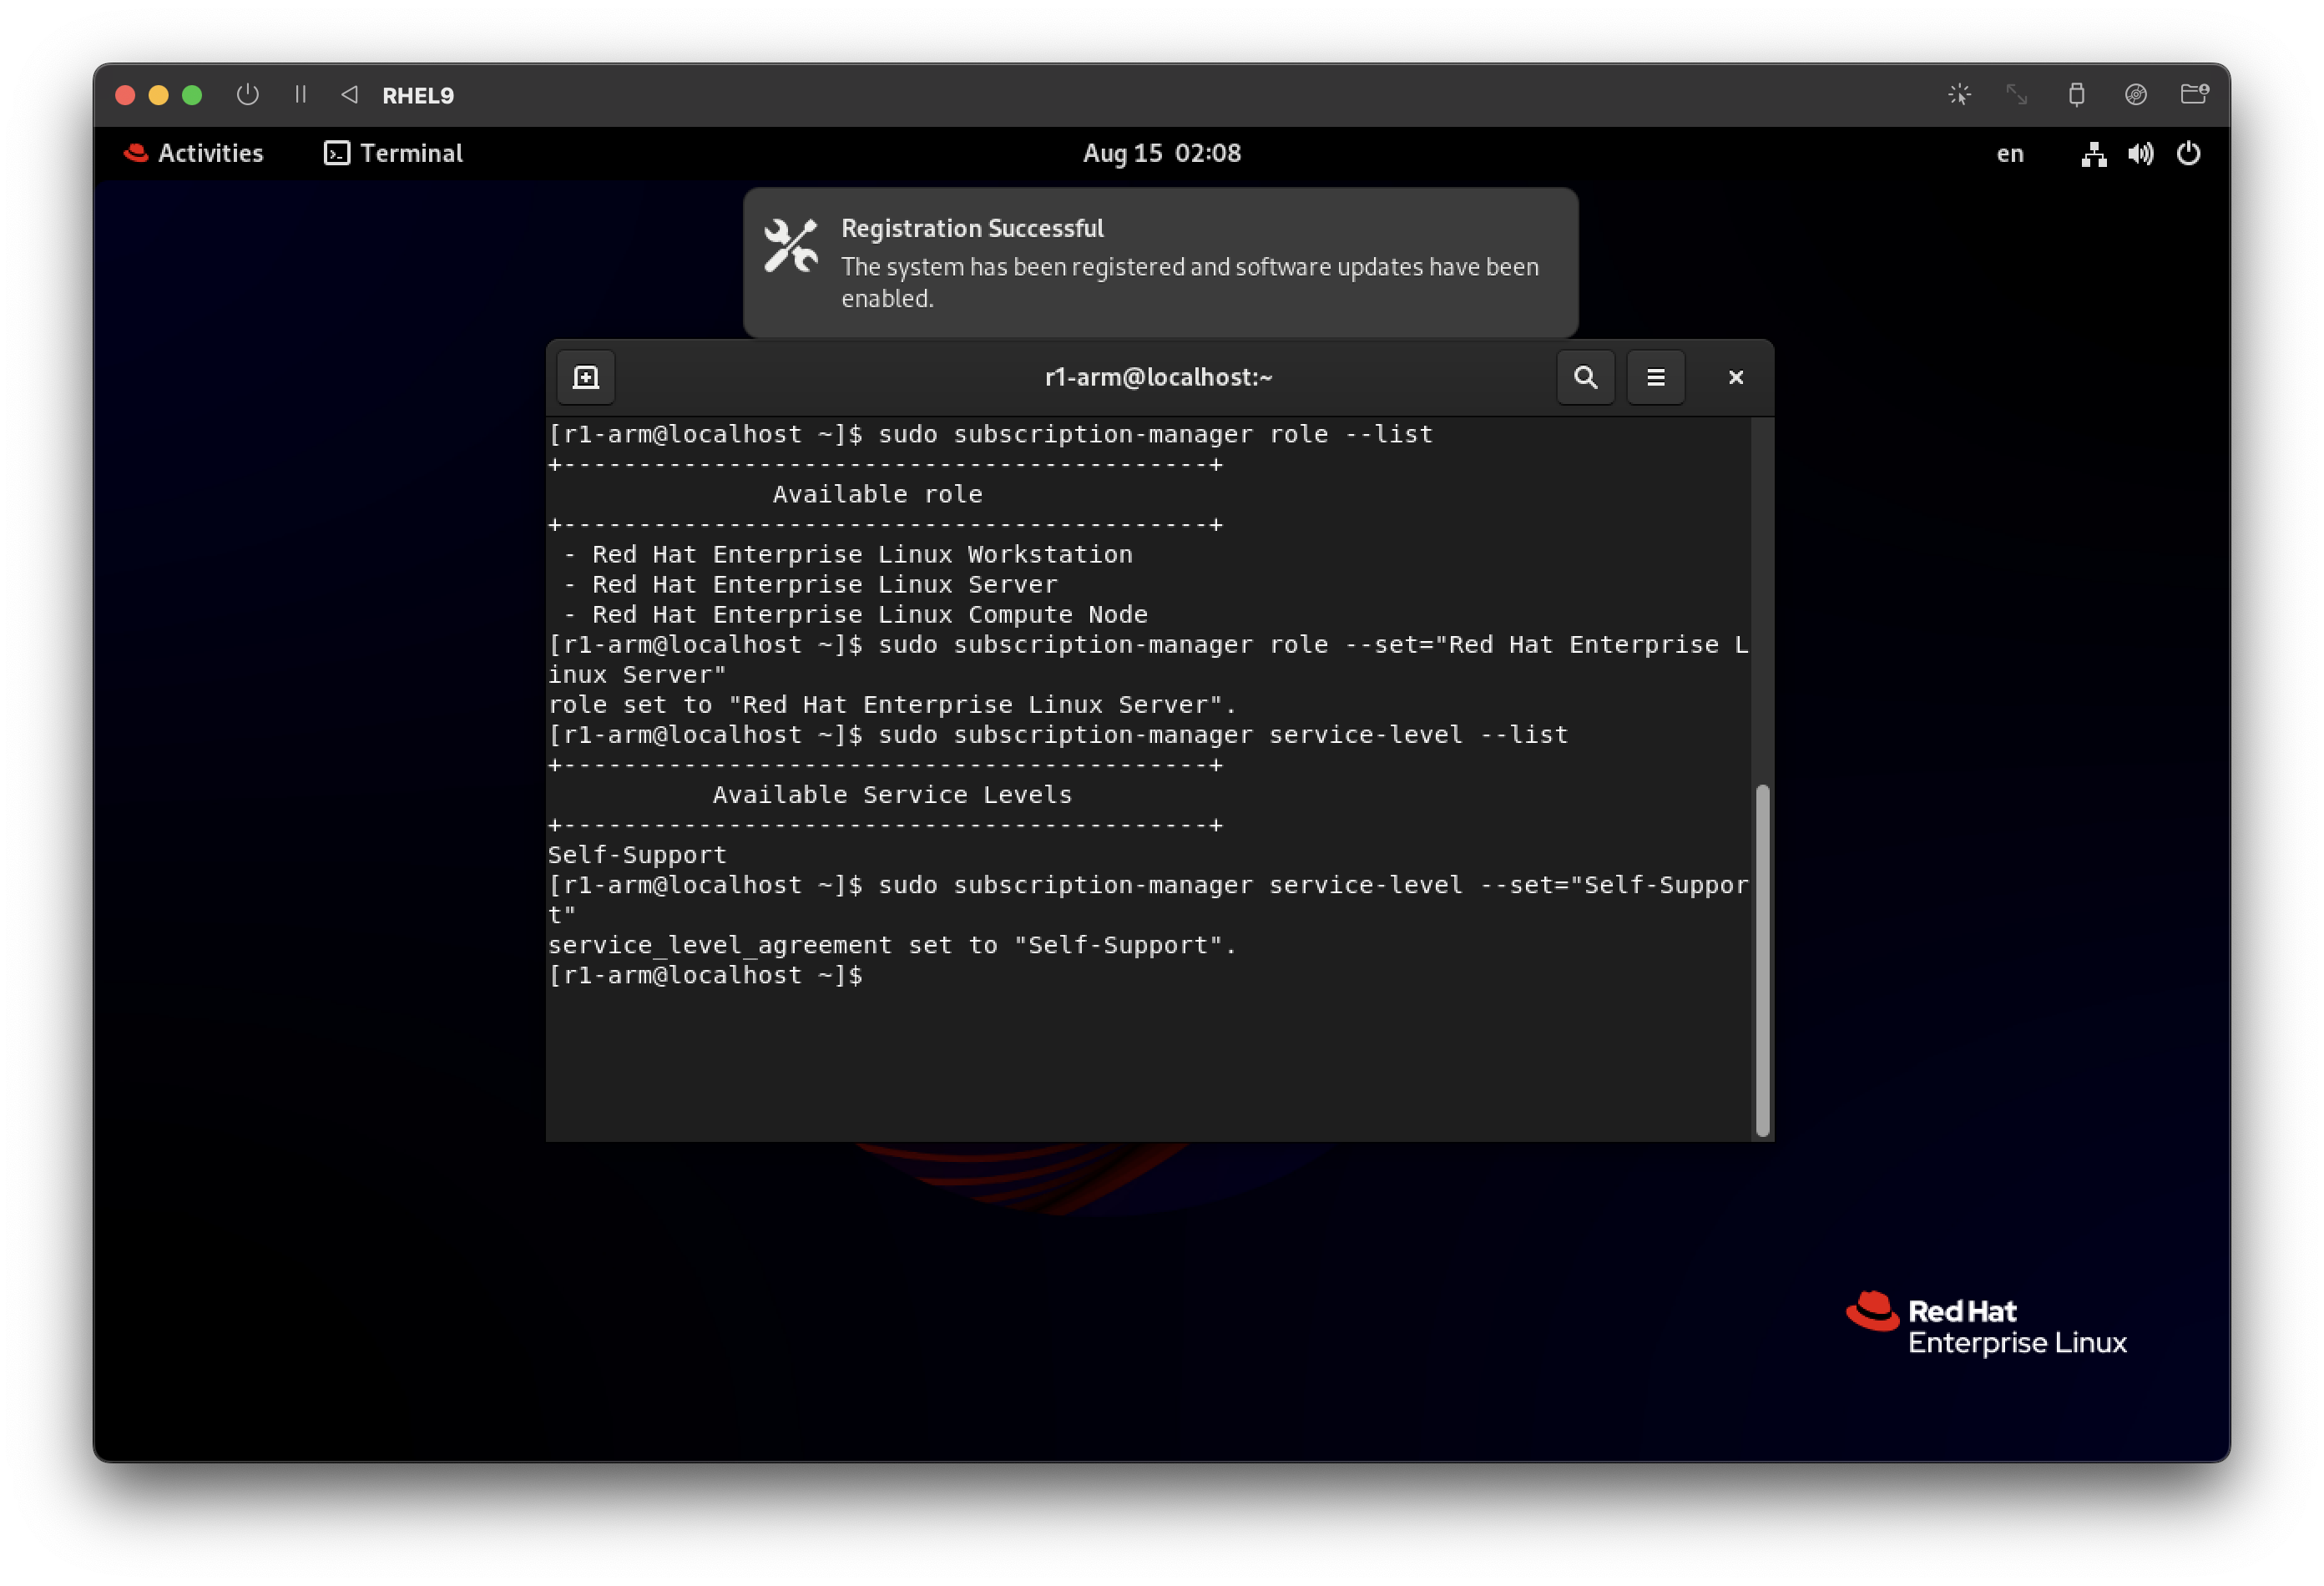
5.2.2 시스템의 서비스 수준 계약(SLA) 설정
subscription-manager syspurpose service-level --list
subscription-manager syspurpose service-level --set="Self-Support"
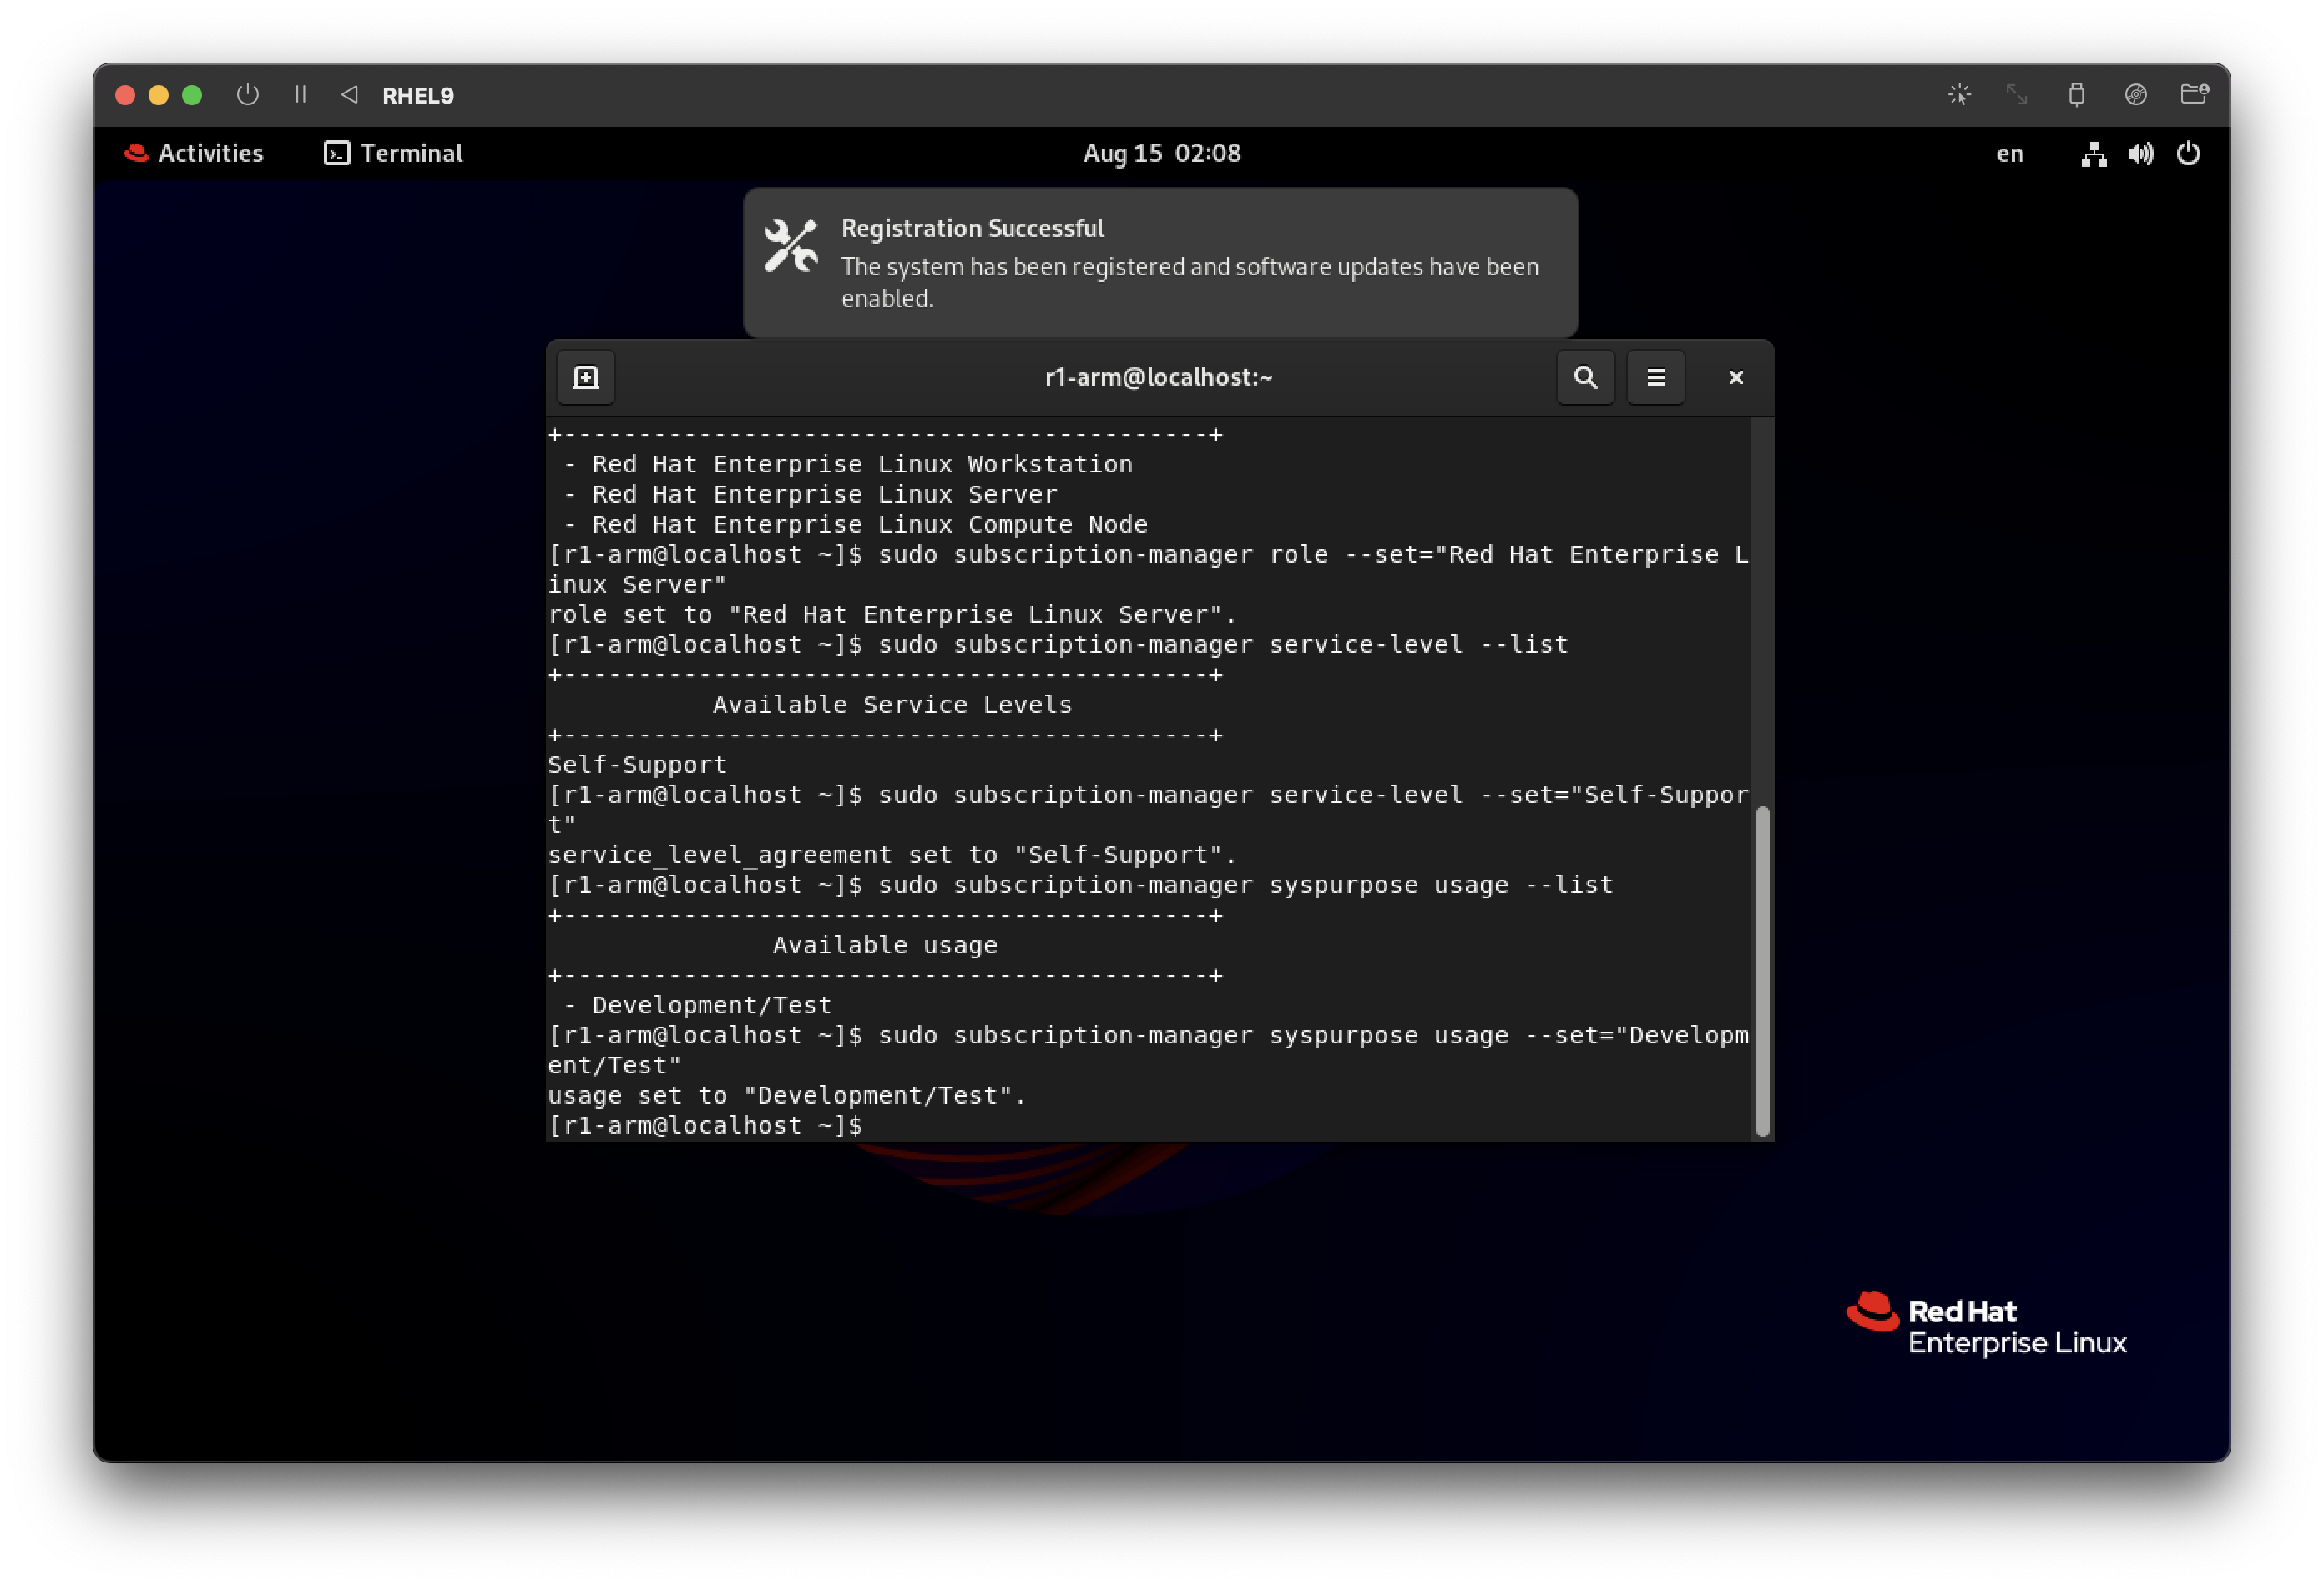
5.2.3 시스템의 용도 설정
subscription-manager syspurpose usage --list
subscription-manager syspurpose usage --set="Production"
5.3 호스트 시스템 아키텍처와 일치하는 인타이틀먼트에 시스템 연결
subscription-manager attach --auto
서브스크립션이 성공적으로 연결되면 다음과 유사한 출력이 표시된다:
Installed Product Current Status:
Product Name: Red Hat Enterprise Linux for x86_64
Status: Subscribed
6. (선택: 듀얼부팅 사용자 대상) Grub 2 부트 로더 구성
이 항목은 선택항목이며, 듀얼 부팅 사용자 중 기본 부트 항목을 윈도우(또는 다른 커널)로 설정하고 싶은 사용자를 대상으로 진행한다.
6.1. 기본 부트 항목 변경
grubby로 부트로더 구성 설정을 할 수 있다. 기본 부트 항목을 변경, Grub 2 메뉴 항목에서 조건 추가/제거 등 가능하다.
다음 명령어로 기본 부트 항목을 변경할 수 있다.
grubby --set-default=kernel-path
grubby --set-default-index=entry-index
grub2-set-default entry-index
하지만, 먄약 entry-index로 기본 부트 항목을 지정할 경우, 새로운 커널 설치 시 인덱싱 순서도 바뀌므로 기본 부트 항목도 따라 바뀐다. 예를 들어, grub2-set-default 0으로 기본 부트 항목을 인덱스 0으로 지정한 상태에서, 새로운 커널을 설치하면 해당 커널이 인덱스 0이 되므로 기본 부트 항목은 새로 설치된 커널로 적용된다. (새로운 커널=기본 부트)
레드햇과 페도라 공식 문서에 따르면:
"Note that the position of a menu entry in the list is denoted by a number starting with zero; therefore, in the example above, the third entry will be loaded. This value will be overwritten by the name of the next kernel to be installed.

To force a system to always use a particular menu entry, use the menu entry name as the key to the GRUB_DEFAULT directive in the /etc/default/grub file."
요약하자면, 항목 인덱스로 부트 항목을 지정하면 새로운 커널이 설치될 때마다 기본 항목이 덮어 쓰이므로, 이를 방지하기 위해 항목 명으로 기본 부트 항목을 지정하면 된다는 말이다.
듀얼 부팅 상황에서 기본 부트 항목이 항상 윈도우를 선택하도록 root계정으로 다음과 같이 진행한다.
-
List available menu entries:
awk -F\' '$1=="menuentry " {print $2}' /etc/grub2.cfg
-
Copy the desired (Windows) entry
예를 들어: "Windows Boot Manager (on /dev/nvme0n1p1)"
-
Set the default entry menu
grub2-set-default "Windows Boot Manager (on /dev/nvme0n1p1)"
-
Rebuild grub.cfg
/etc/grub2.cfg는 grub.cfg의 심링크이며, 안정성을 위해 심링크를 사용하지 않고, grub.cfg의 절대경로에 직접적으로 적용한다.
grub2-mkconfig -o /boot/grub2/grub.cfg
Fedora 34 또는 RHEL 9 부터는 grub2-mkconfig -o /boot/efi/EFI/fedora/grub.cfg을 사용하면 안된다.
-
Reboot and confirm
시스템 재시작을 통해 잘 적용됐는지 확인한다.
 systemctl reboot
 sudo grubby --info DEFAULT
References
]]>


 |
```shell
winget install -e --id CondaForge.Miniforge3
exit
```
#### **1.2 계정의 환경 변수 추가**
명령 프롬프트(관리자 계정 x)에서 다음 입력하여 계정의 환경 변수 추가 ([source](https://developers.google.com/earth-engine/guides/python_install-conda#windows_4)):
| |
|:---:|
|
|
```shell
winget install -e --id CondaForge.Miniforge3
exit
```
#### **1.2 계정의 환경 변수 추가**
명령 프롬프트(관리자 계정 x)에서 다음 입력하여 계정의 환경 변수 추가 ([source](https://developers.google.com/earth-engine/guides/python_install-conda#windows_4)):
| |
|:---:|
|  |
```shell
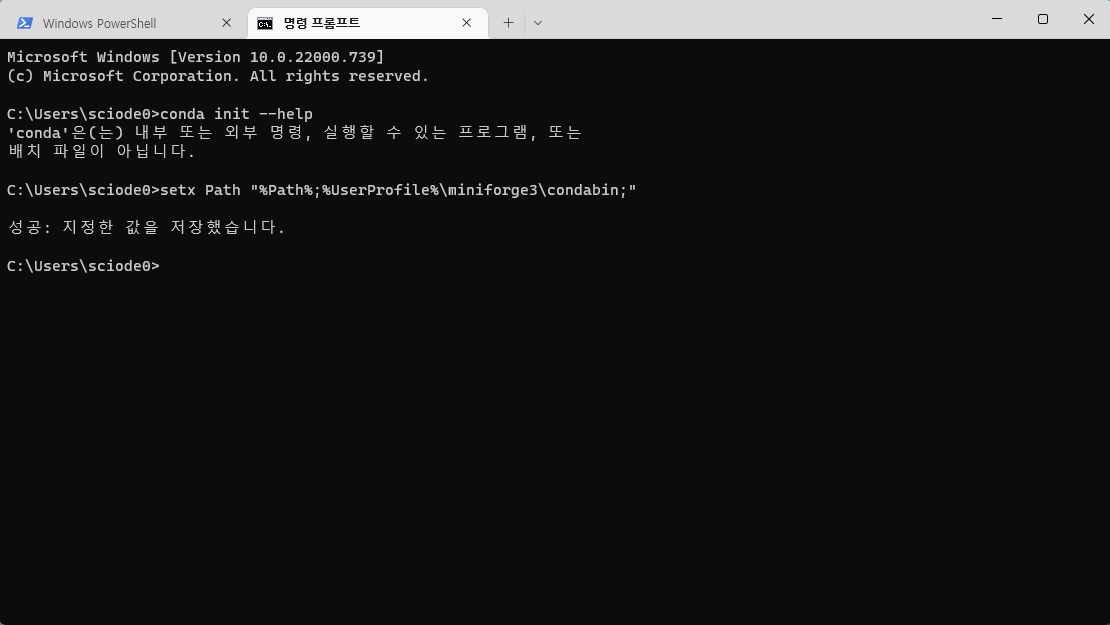
setx Path "%Path%;%UserProfile%\miniconda3\condabin;"
```
#### **1.3 conda 사용 준비**
PowerShell에 다음을 입력하여 conda 초기화 후 PowerShell 재실행:
| |
|:---:|
|
|
```shell
setx Path "%Path%;%UserProfile%\miniconda3\condabin;"
```
#### **1.3 conda 사용 준비**
PowerShell에 다음을 입력하여 conda 초기화 후 PowerShell 재실행:
| |
|:---:|
| 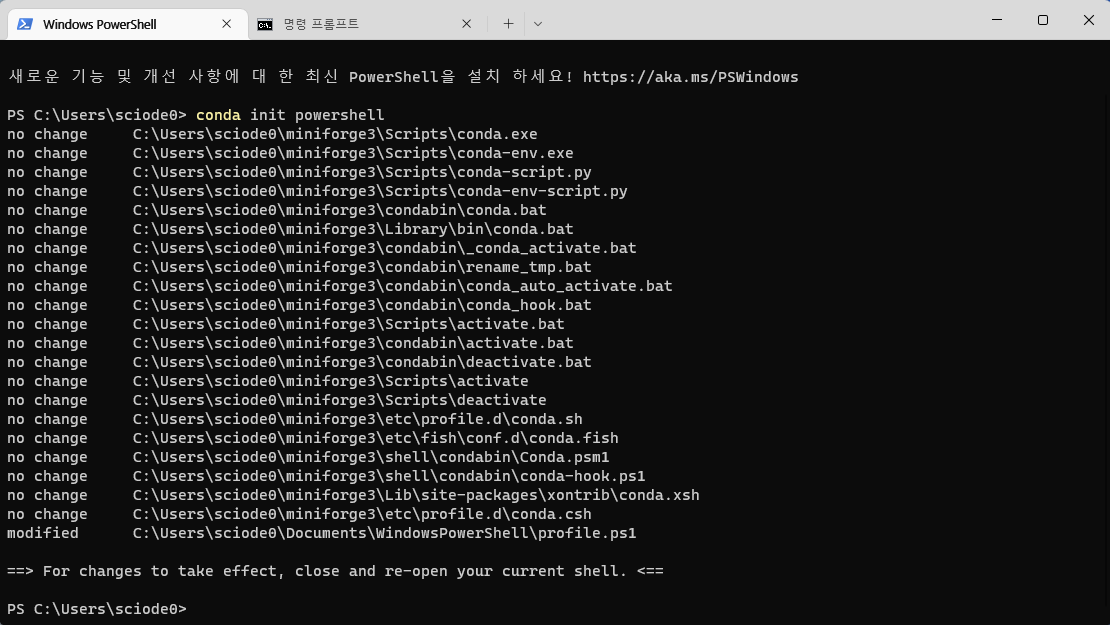 |
```shell
conda init powershell
exit
```
#### **1.4 스크립트 실행 권한**
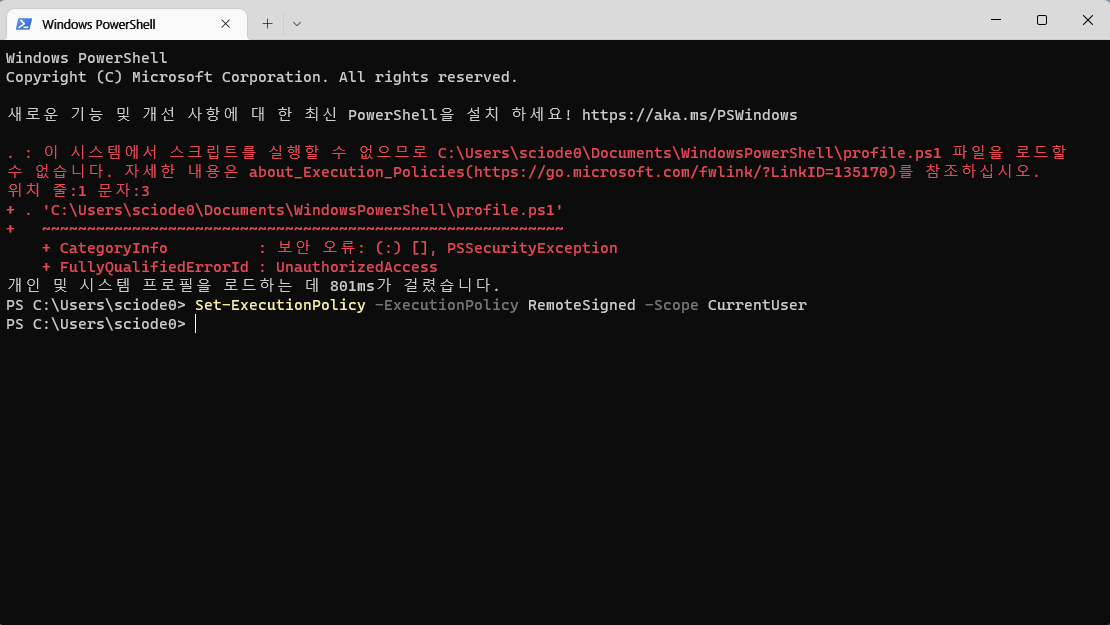
"`profile.ps1 파일을 로드할 수 없습니다`"라는 에러가 날 것이다. 이때, 다음을 입력하고 PowerShell 재실행:
| |
|:---:|
|
|
```shell
conda init powershell
exit
```
#### **1.4 스크립트 실행 권한**
"`profile.ps1 파일을 로드할 수 없습니다`"라는 에러가 날 것이다. 이때, 다음을 입력하고 PowerShell 재실행:
| |
|:---:|
|  |
```shell
Set-ExecutionPolicy -ExecutionPolicy RemoteSigned -Scope CurrentUser
exit
```
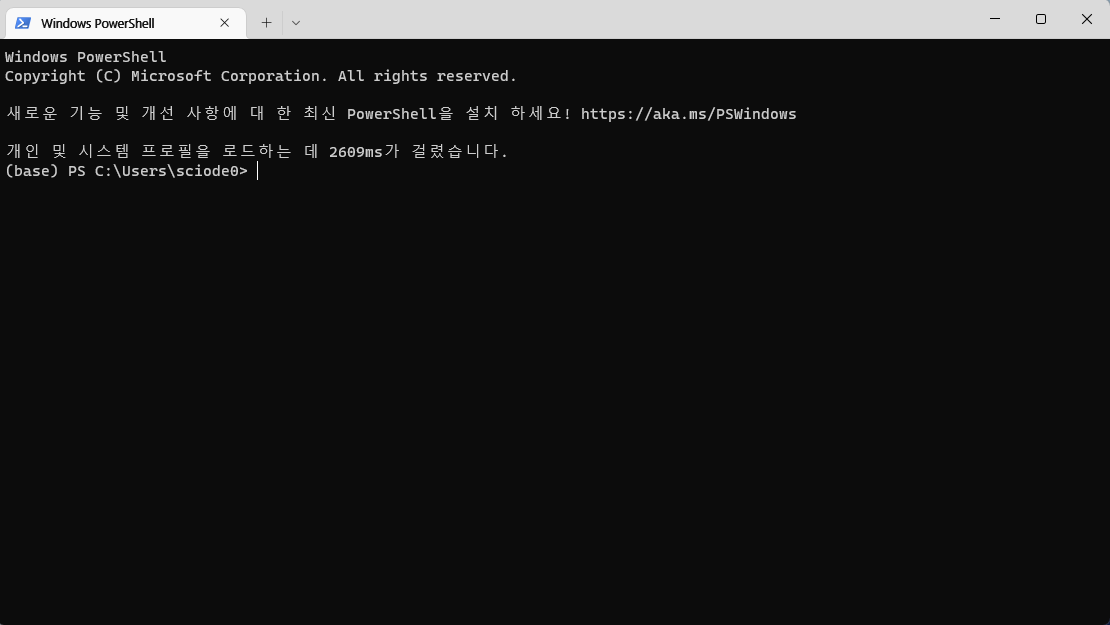
PowerShell 다시 실행 후 입력란 맨 앞에 `(base)` 콘다 환경이 실행중이면 성공.
| |
|:---:|
|
|
```shell
Set-ExecutionPolicy -ExecutionPolicy RemoteSigned -Scope CurrentUser
exit
```
PowerShell 다시 실행 후 입력란 맨 앞에 `(base)` 콘다 환경이 실행중이면 성공.
| |
|:---:|
|  |
|